
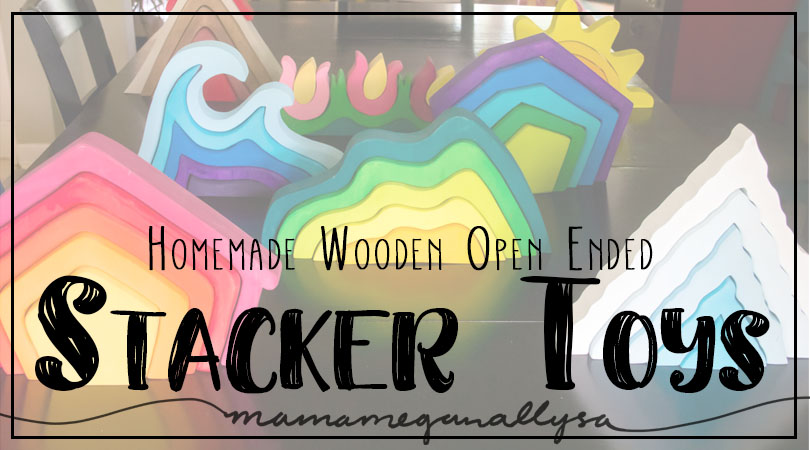
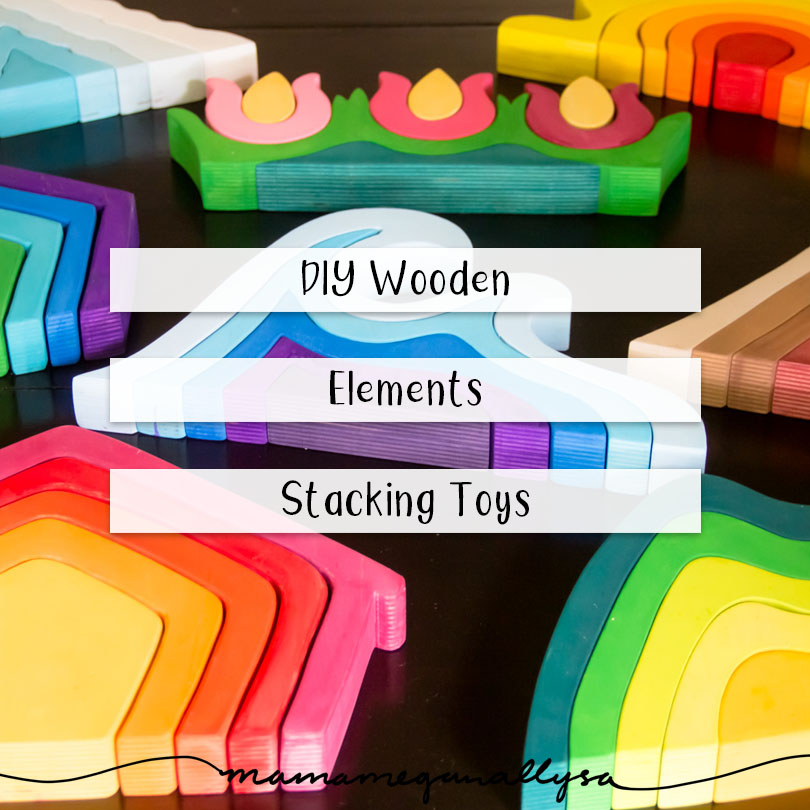
I finally finished our DIY stacker toys!!! Seriously this has been months in the making. These are going to be great open-ended toys to add to Bitty’s collection and I can’t wait to watch her grow and learn with them!
PSA: Buckle up baby. Long Post Alert
This post contains some affiliate links. As an Amazon Associate, I earn from qualifying purchases. I may receive a small commission from if you follow and decide to purchase. There would be no additional cost to you!
DIY Stacker toys were a time investment
Back in like February or March, I got the grand idea to make my own stacker toys. I will warn you now that this is not a project for the faint of heart or a weekend project. Even if I have worked on it religiously it would still have taken at least a month of working evenings and nap times. Countless hours cutting, sanding, cleaning, sanding more, and painting.
That said I am thrilled with the way they turned out and I have plans for more!
Wood is having its toy moment right now
If you follow the children’s toy market right now you’ll have noticed wood is all the rage, and I am here for it. Having Bittys play space in our living room means her toys are a major part of our décor. Thus I want her toys to be pretty to look at. Natural fibers generally do a better job matching my aesthetic than plastic does. ALSO, most plastics toys are just too busy and over the top!
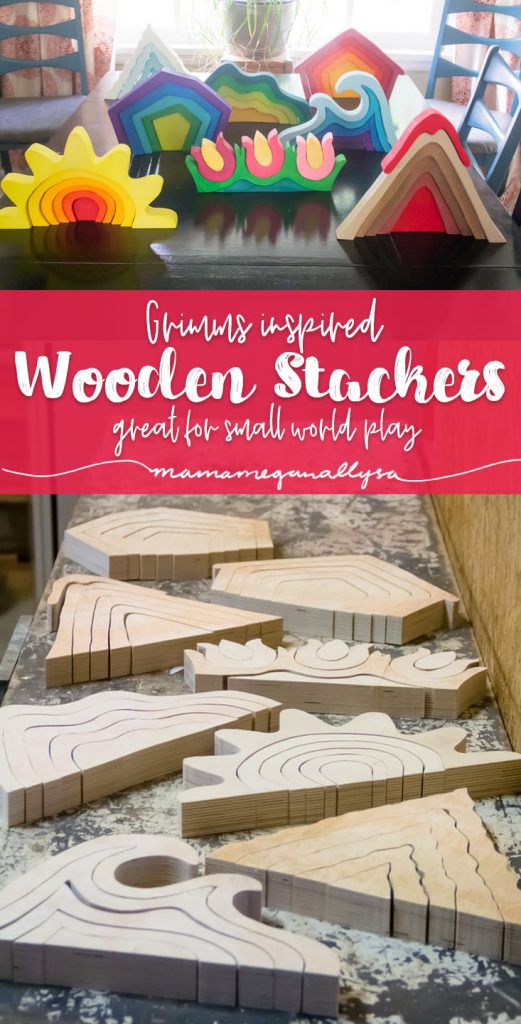
Our DIY stacker toys were very much inspired by our Grimms rainbow and these wonderful stackers by Clickity Clack on Etsy. But if you know me I have this problem…If I think I have any ability to do something myself…well, I have to.
I am extremely lucky to have a dad with one heck of a workshop and some seriously impressive power tools that I knew I was going to need to have any chance of doing the projects I had envisioned.
So we planned a trip to South Dakota and I got busy!
DIY Stacker toys had many revisions
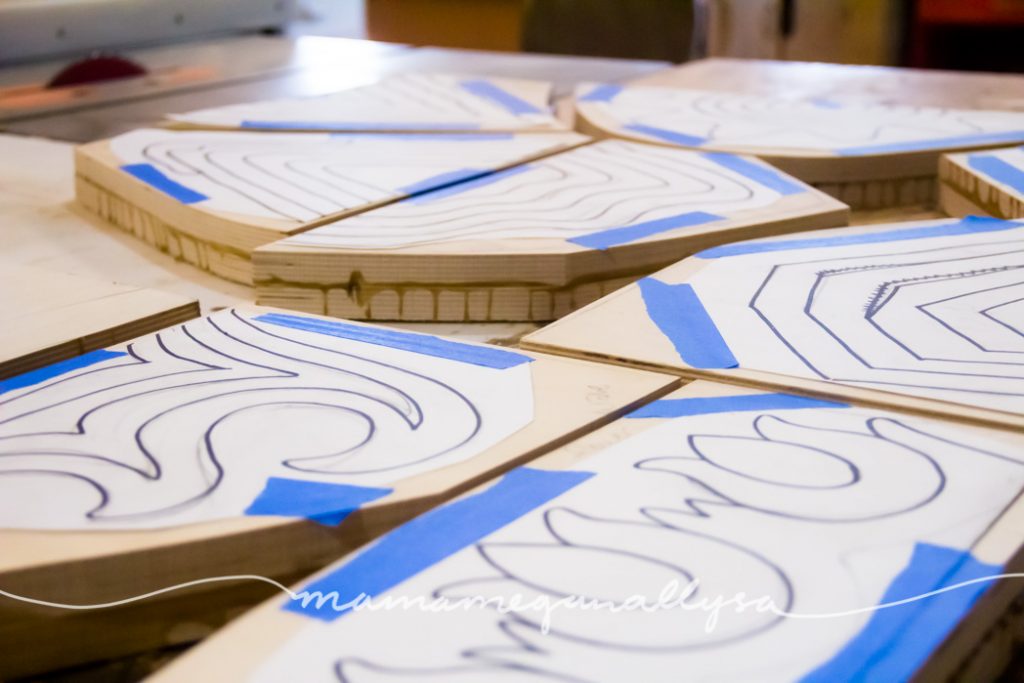
The entire process started with working out the actual sizes and designs I wanted the stackers to be. I had a vague idea of what I wanted but once you get the wood in front of you, generally you want a better idea before you start cutting.
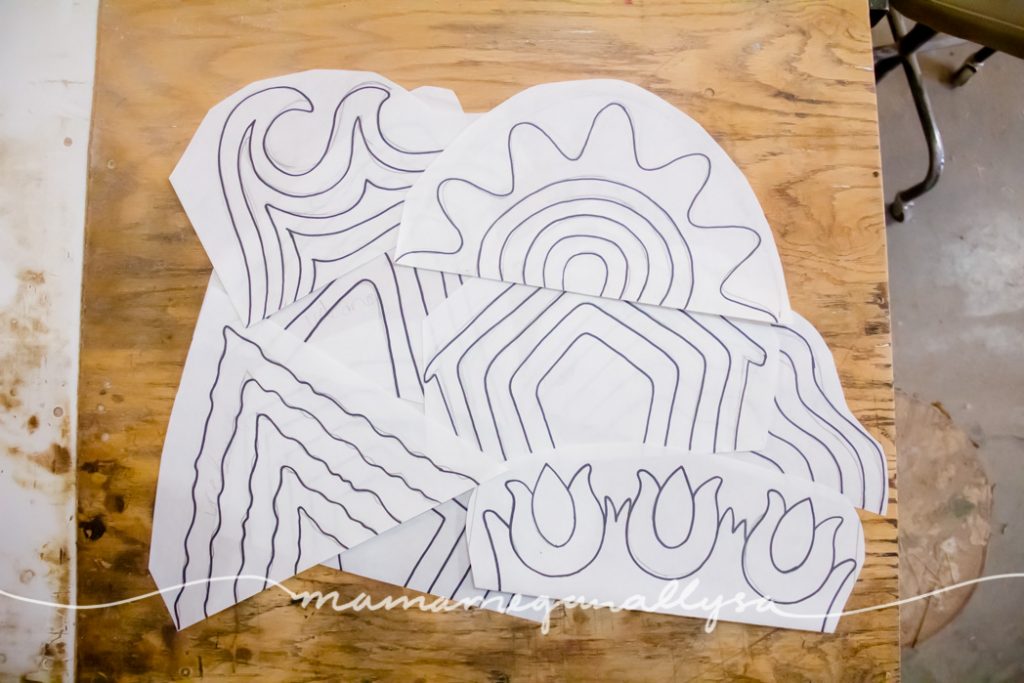
After I have a basic idea of the size and a general layout I tetris’d them onto my sheet of Baltic plywood. Who said video games wouldn’t teach you anything!
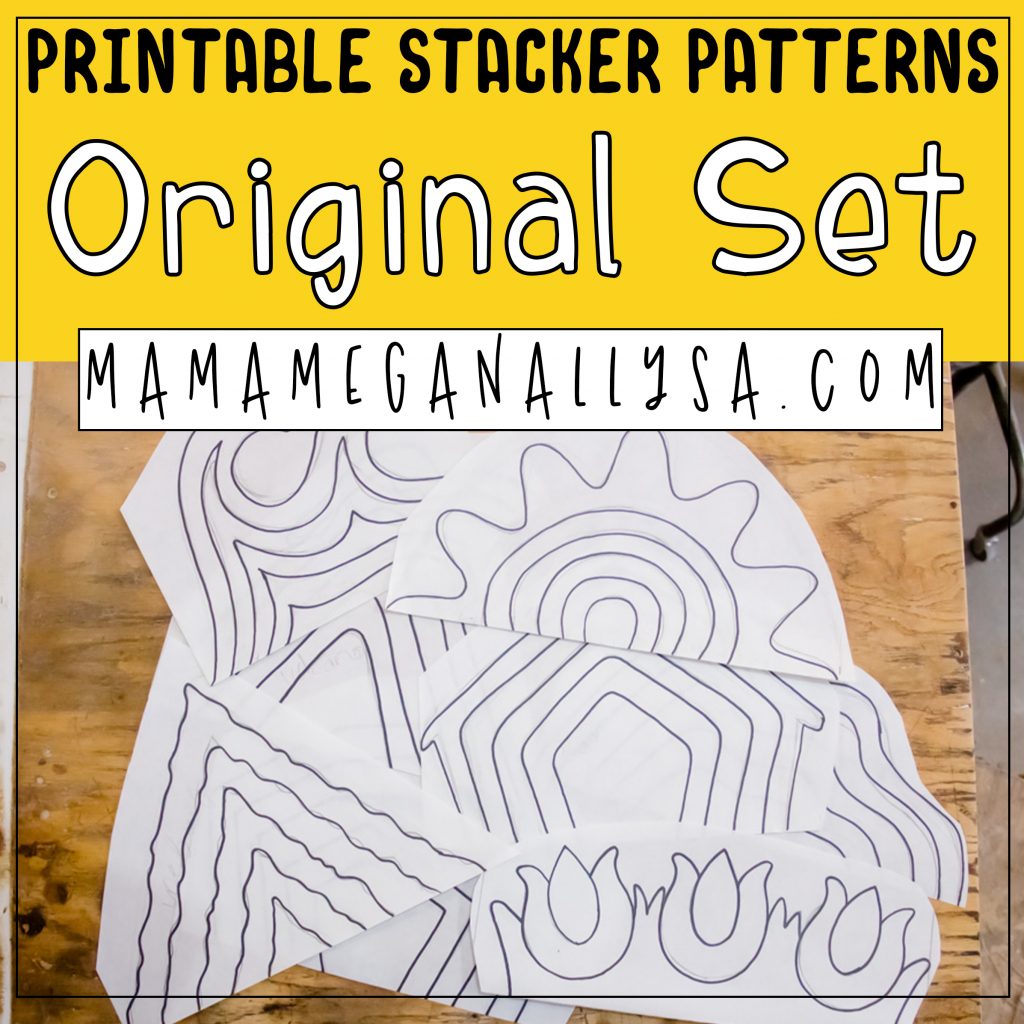
You can download my DIY Stacker Toy templates right here!
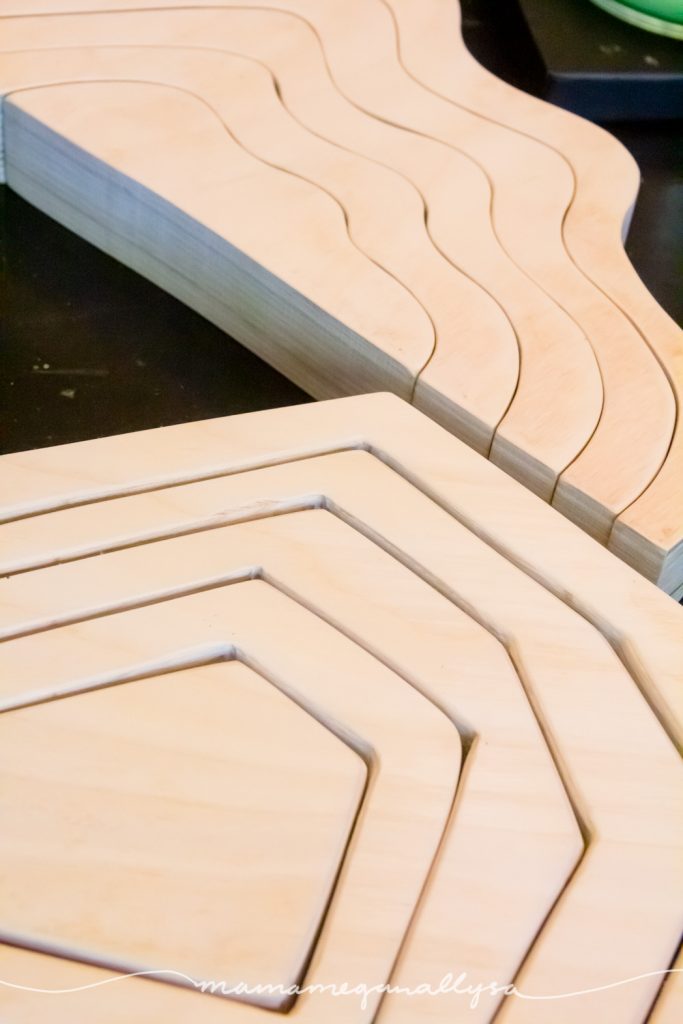
After the sheet was cut into pieces trace those pieces onto a second sheet of plywood and cut again! We did two sheets of Baltic Plywood on the recommendation of my dad. This gave the final outcome a wider base to stand on and also helped to strengthen some of the areas that were more prone to problems
So LOTS of wood glue and clamps later we were left with a pile of laminated plywood ready to be cut.
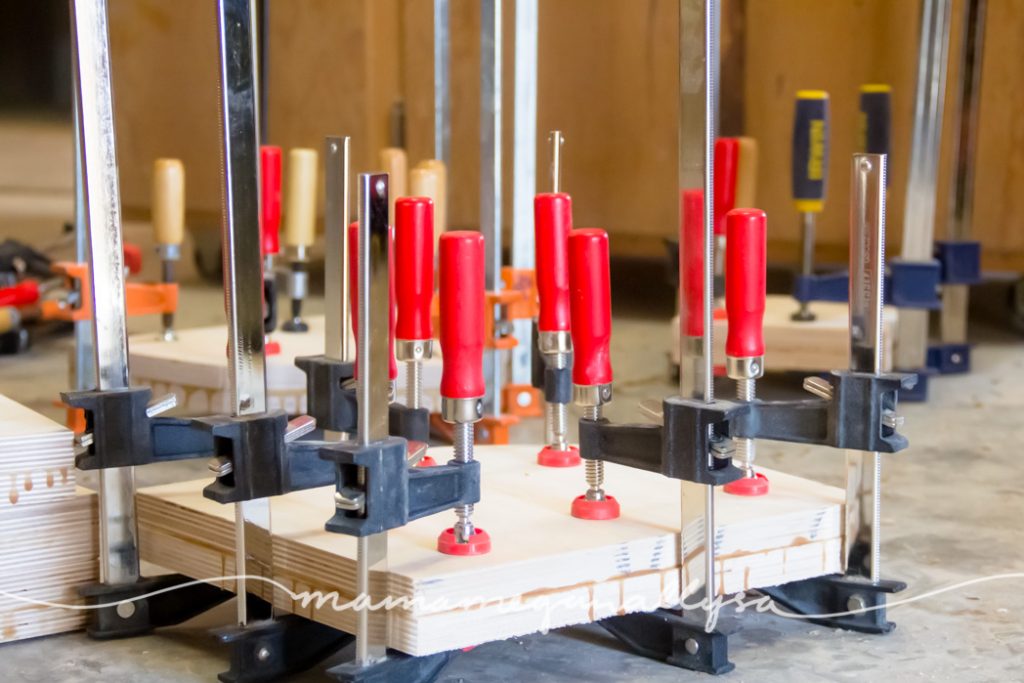
For the starting rough cuts, I just had the designs taped on, but I knew that when it came time to cut the inner bands I would want a line to follow. The easiest way was to glue the paper designs to the wood. We used a quick construction adhesive. I do not recommend you go this route. It was a nightmare getting the templates off when we were done and there is still some residue/chemical damage to the wood that I was unable to sand away. (Future Megan popping in to say look into Easy Tac for adhering your templates to the wood!)
Cutting the DIY stacker toys
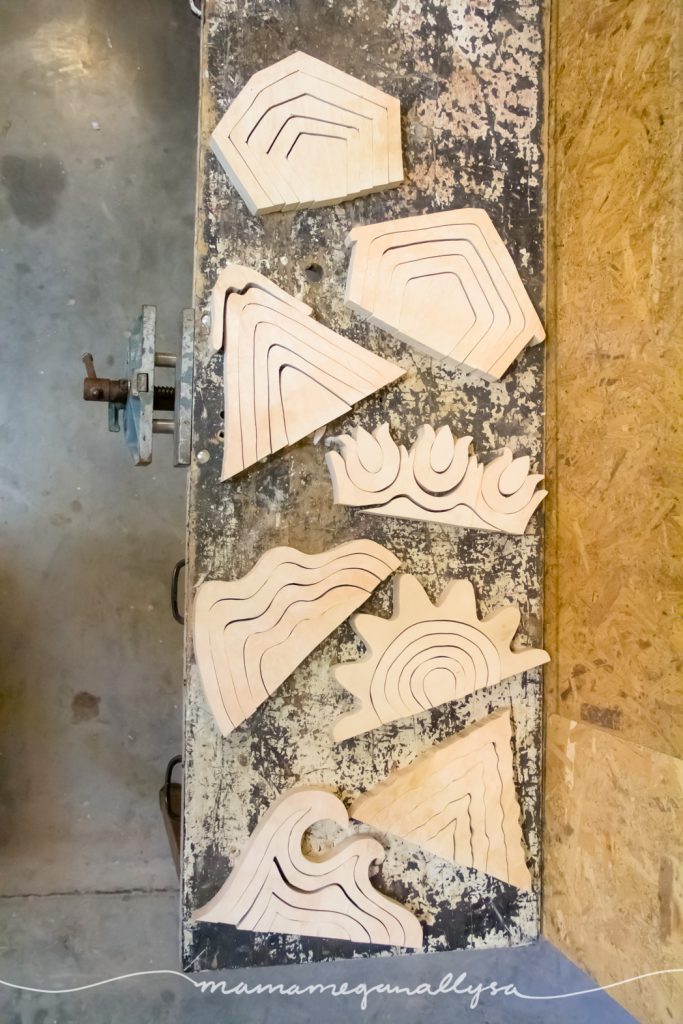
I used a bandsaw for these designs. If you plan on attempting your own DIY stacker toys I would recommend a scroll saw instead. You will be able to make tighter turns and the cuts will be more delicate overall.
I started by trimming away the outer excess from each piece. This was a nice way to warm up to the machine as it wasn’t as vital to make my cuts in one precise path. I could come at the piece whatever way I needed and make straight cuts.
After that, there really was no point in waiting anymore. I started cutting. I will say that for a good number of these I had help on this step. Not because I asked for it but because both Zak and my dad wanted to take a crack at cutting these more complex shapes. So I shrugged and started sanding.
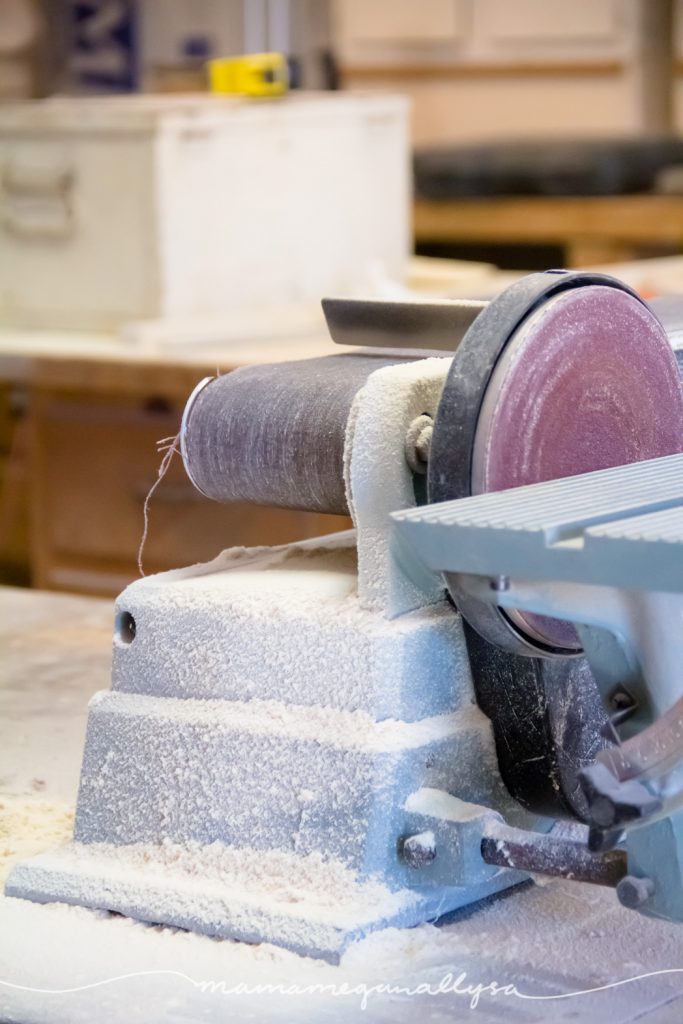
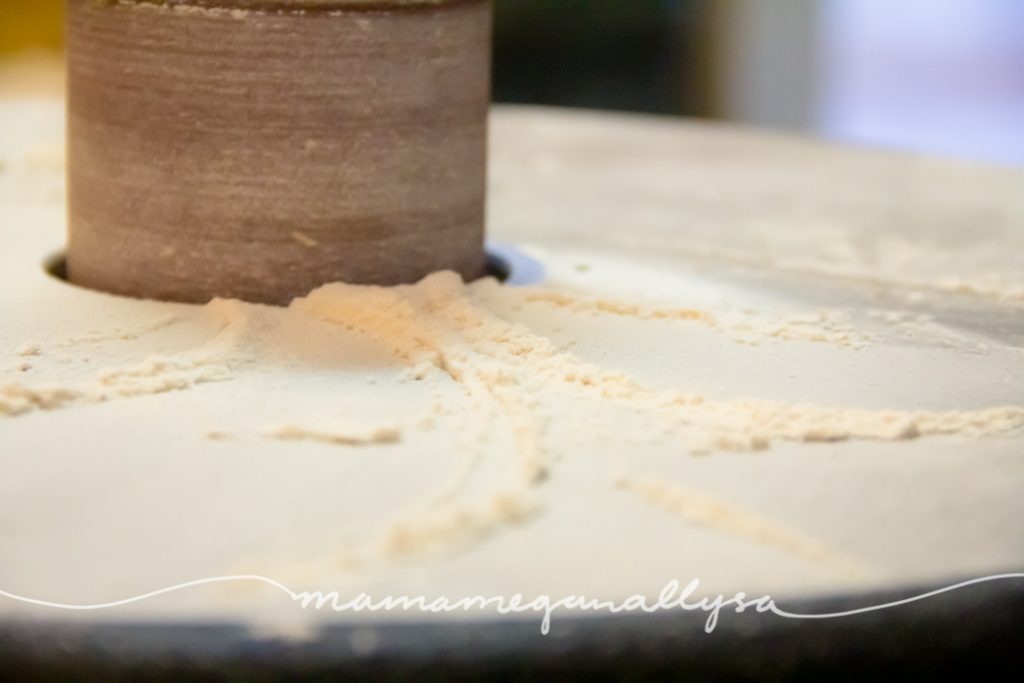
So Much Sanding
With these being intended for children’s toys I wanted to make sure they were smooth and silky. No sharp corners and definitely no splinters. The device of my choice was a drum sander. It was able to take those rolling hills and band of sunshine no problem and was 100% better than having to hand sand all of these bands!
I was able to give everything curvy a once over on the drum sander and even start on the less curvy pieces before we had to come back home.
I again called in the cavalry to help remove the paper templates at this point. And oh baby was that a task and a half. We managed to get them off with just some residue left on the boards. I knew I was going to have to sand that off and planned on doing that at home later
Our workshop growth
Our shop space at home has been growing exponentially between my woodworking projects and Zak’s metalworking, so we have a pretty healthy set up of our own including a belt sander that I was going to commandeering for a bit.
I continued to sand on the pieces and even picked up a drum sanding accessory kit for our drill press to do some fine-tuning on some of the curves that needed more TLC. That was totally worth the purchase in case you were curious.
It was time to try and tackle that residue…In comes the old trusty orbital sander a clamp or two, and some elbow grease. It took some work but I was able to get most all the reside and odd discoloration off the pieces. Some of the pieces never fully recovered so word of advice. Either use some sort of washable glue or maybe put your pieces through a planer to get all that of… (EDIT – I have not yet used but have heard great things about EasyTac for holding your templates on)
I then proceeded to give our DIY stacker toys a once over by hand with some fine-grit sandpaper. This was just to make sure everything was super smooth. I also wanted the bottom of the bands to still have as much surface area as possible so I found hand sanding that part was the best option.
As I sanded more and more of these I got a better idea of how rounded I wanted the edges to be and you can clearly see the difference between the cave and the hill. The cave was the first one I finished sanding and he had some cutting errors that had to be blended out and thus he was a bit too rounded in the end. Where the hill feels much flatter and holds together a bit better because of it.
DIY stacker toys its all about that wood grain
I took a break here while I researched coloring options… I wanted to be able to see that wood grain and feel that texture when you played with them. Not to mention that unsealed texture actually helps them sort of stick together a bit.
My options were this
- Acrylic paint – watered down so that the wood grain would show through
- DIY wood stain – made from oil paints
- Wood Dye – difficult to come by
- Food dye – readily available and also nontoxic
I had problems with all of these
- Acrylic Paint – when watered down it can get a little dull and it will always block woodgrain to some point.
- DIY wood stain – a bit time-intensive to make and no way to make the colors non-toxic that I knew of
- Wood Dye – Expensive, especially when I needed the full rainbow
- Food Dye – water soluble
In addition to the choices of color, there was the question of sealing the color in some way. I have yet to actually do this step and I may never do it. Lol If you have a great way to seal wood without losing the texture let me know down below!
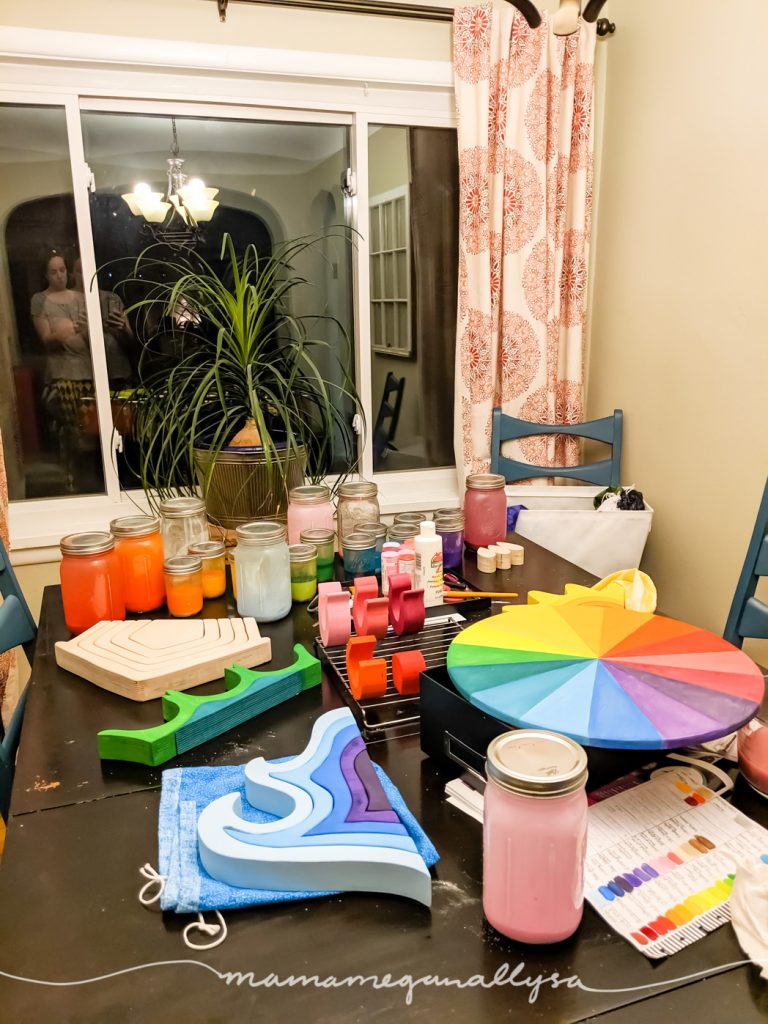
Planning my colors before actually painting
I ended up going with acrylic in the end and I can say that I am very happy with the outcome (though I am still super interested in the wood dye, that will have to be for another project another day)
I was super thankful to have had my loose parts set already done and painted because the wood coins were perfect paint swatches to give me an idea of what worked well together! It was so easy to rearrange the coins and try different combinations without having to waste a ton of time and paint and scrap paper!
It took a lot of deliberations to figure out what I wanted in the end. Some were easy I had a vision and I knew what I wanted. Others took a lot of tweaking and rearranging.
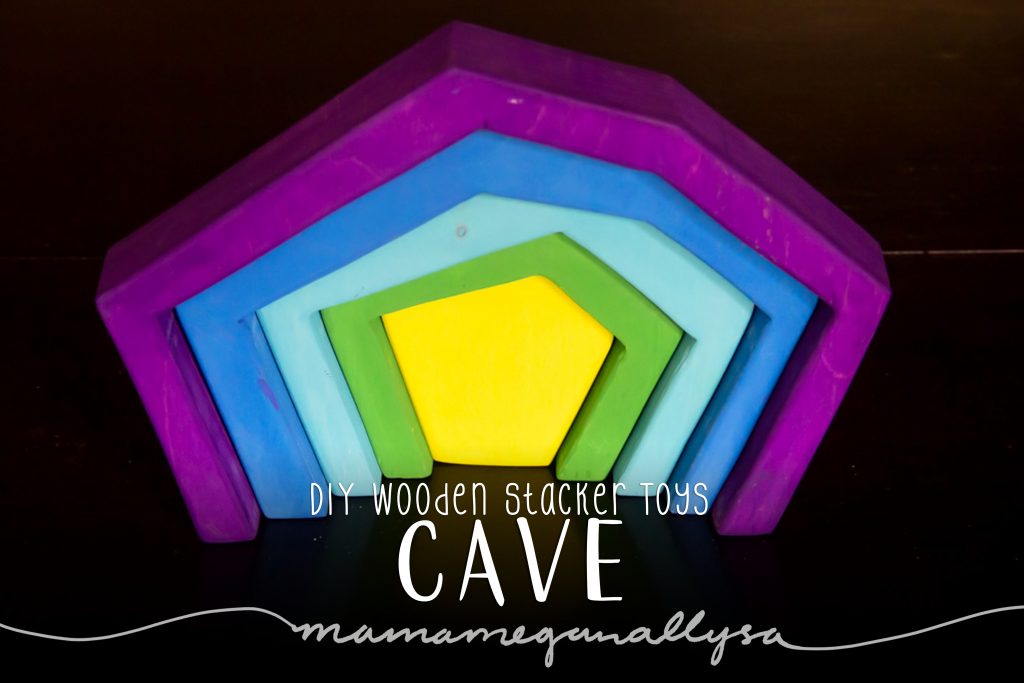
For example the Cave I knew I wanted to go from purple to green. So sue me I LOVE the way the Grimms cave looks and this was my attempt at my own version. The House, on the other hand, I wanted the outer band to be red and it took me forever to select the colors for the rest of it.
Painting the DIY stacker toys
After I finally picked the colors it was time to bite the bullet and lay paint on wood. It was weird how much I resisted this step. It was like I was so scared of messing them up and I didn’t want to start over…
I pre-mixed all my colors with water and stored them in some small mason jars, this way it would be easy to switch between colors and not waste any!
After many an evening of painting and listening to my Audiobooks (Audible is our jam. Let me know if you need some recommendations I have a LIST lol) The stackers were done!
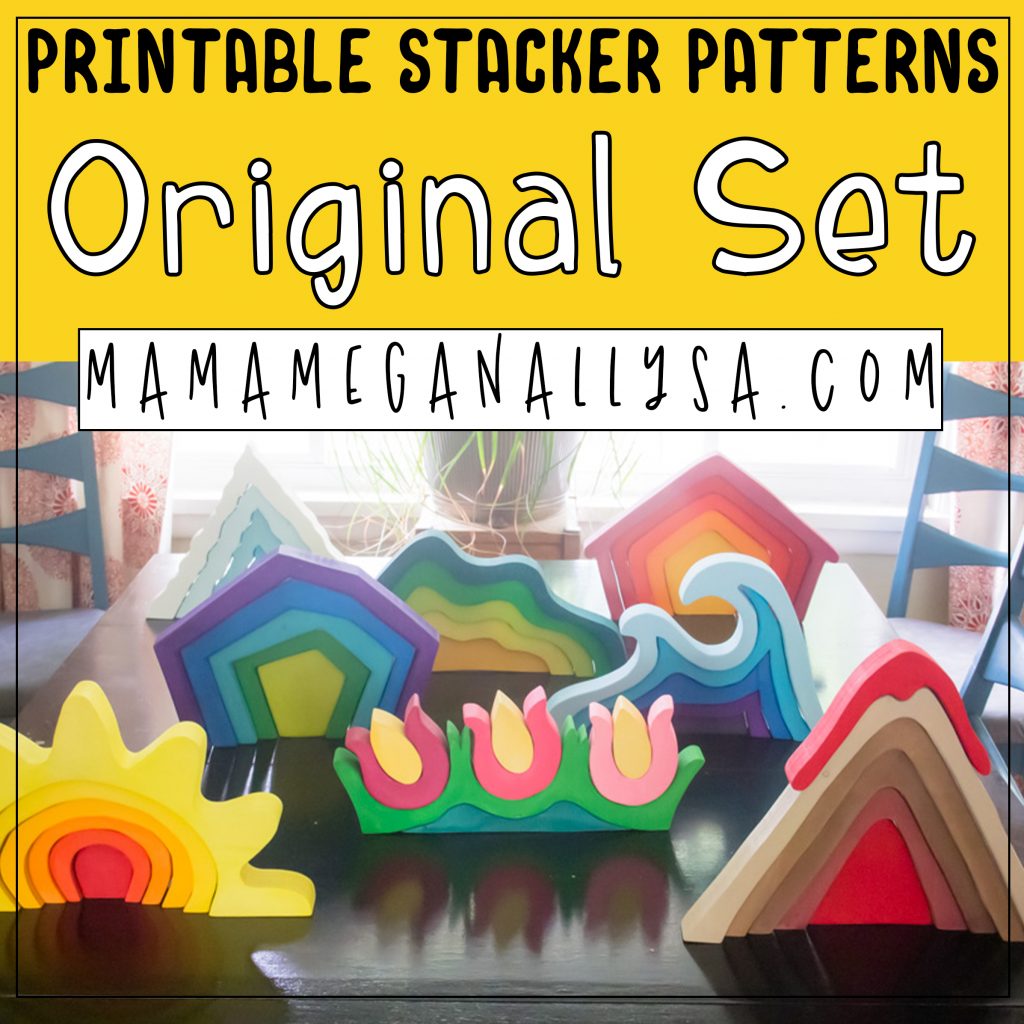
The Complete DIY Stacker Toys Collection
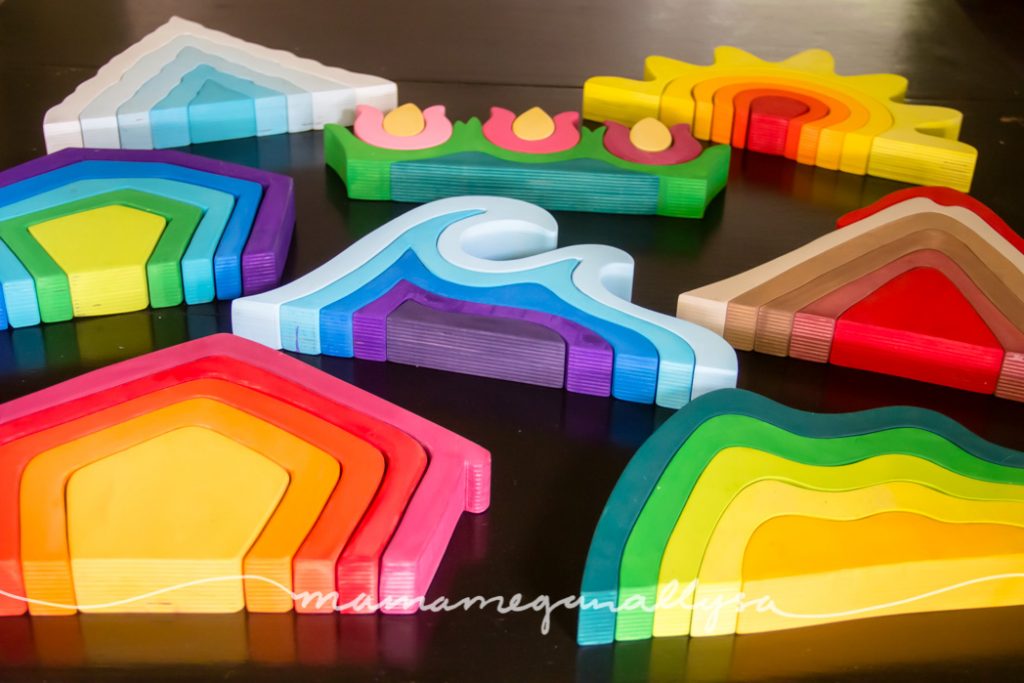
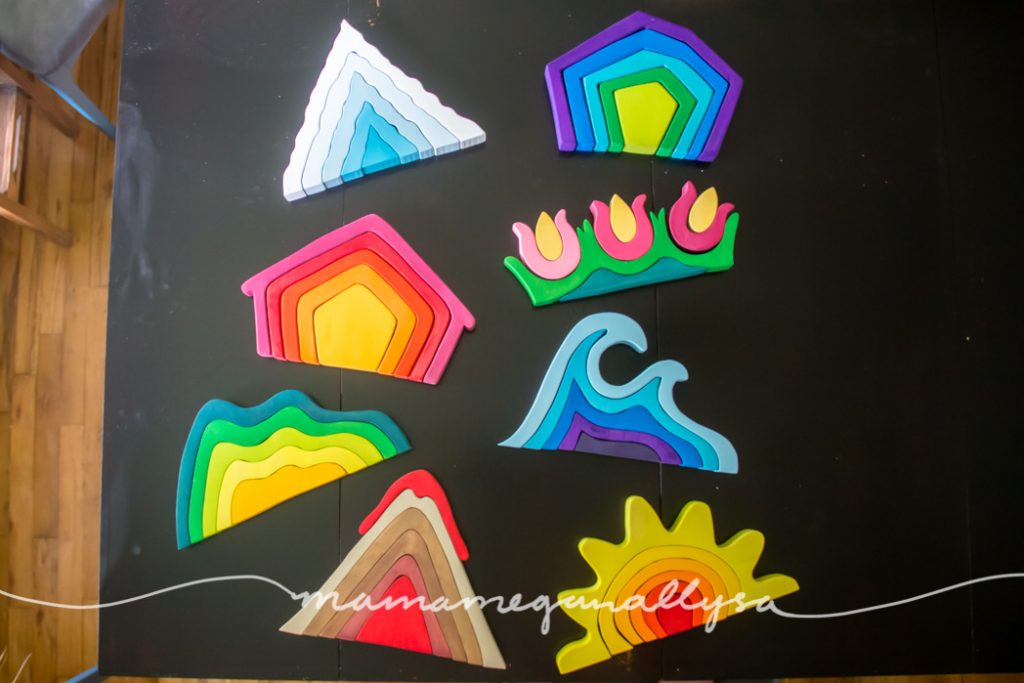
a Close up of the Big Reveal
If you follow me on Instagram you have seen peaks of our DIY stacker toys in my stories and on my feed. And without further ado here is the completed set!
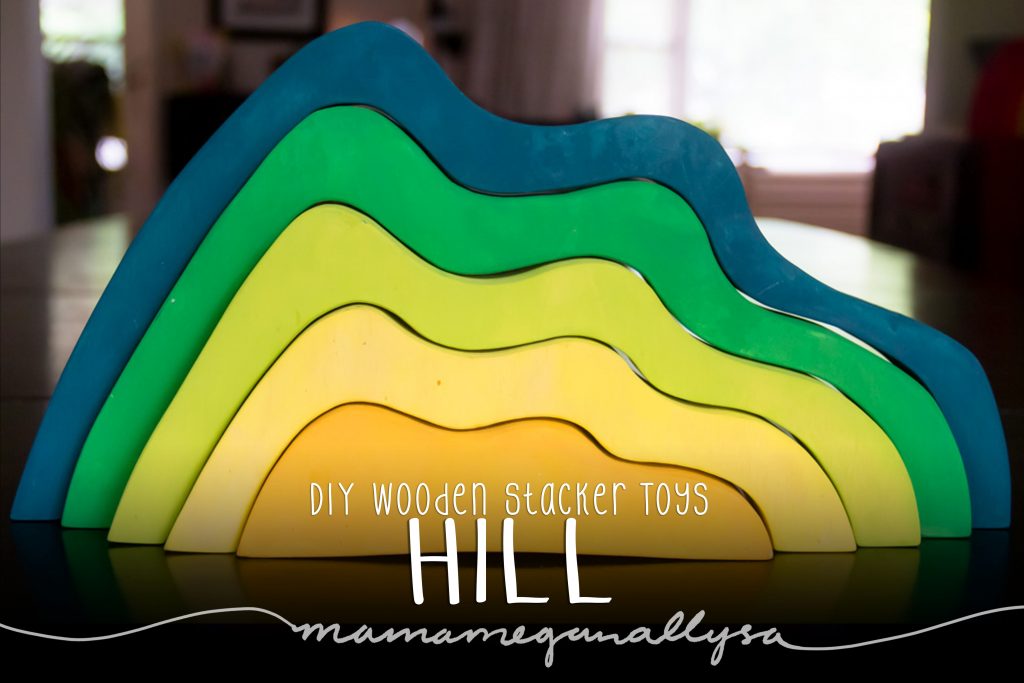
The Hill
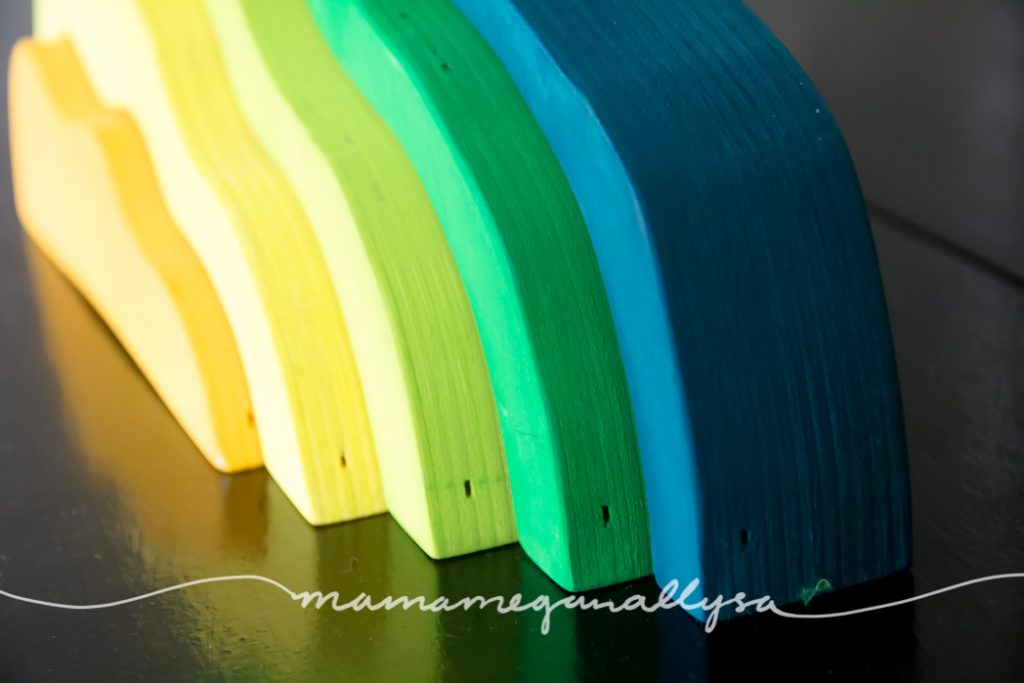
Originally unplanned but I had space on the board when first designing them and I am so glad I did. This one might be my favorite.
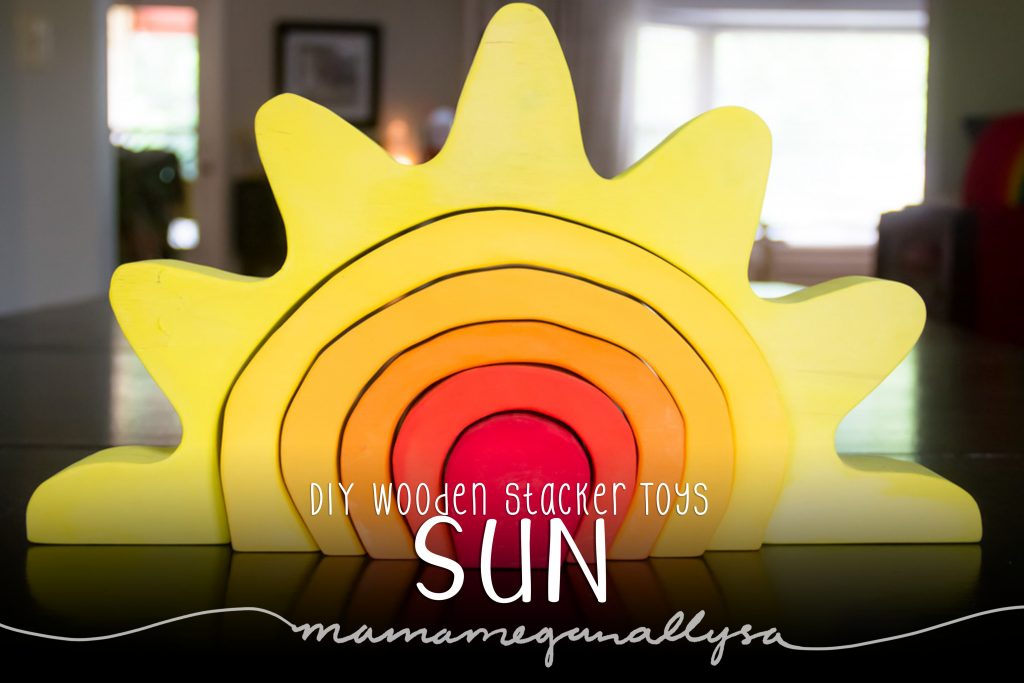
The Sun

If I were to remake this I would paint the outer rays a lighter yellow as in person it is a very similar shade to the first inner band.
The Cave
I would love to take another crack at this one and take better care cutting so that the bands fit together a little more snugly!
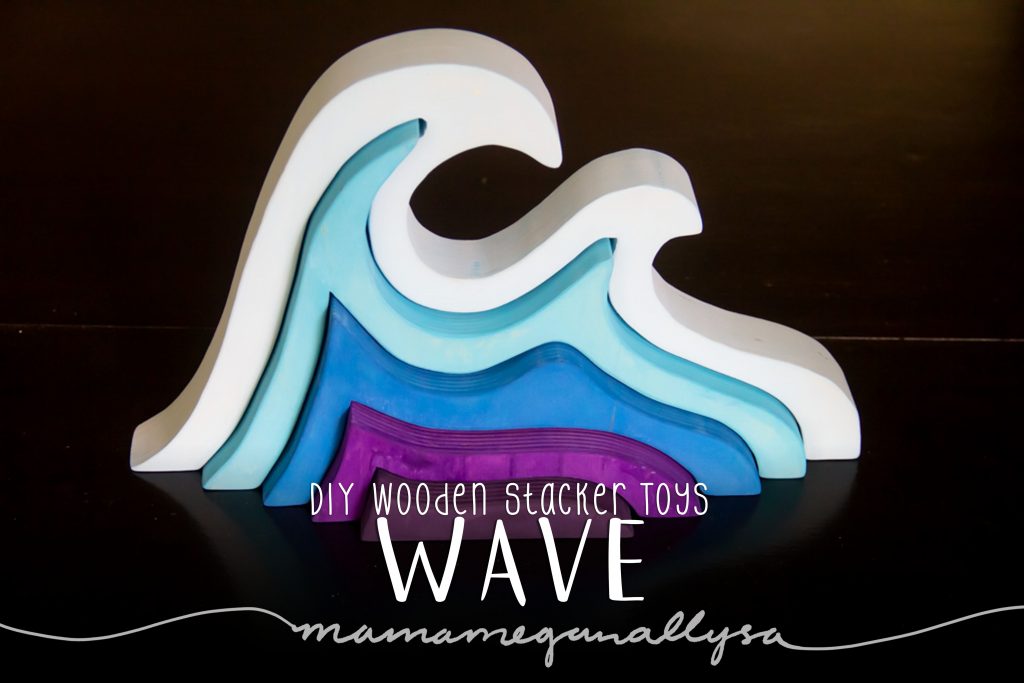
The Wave
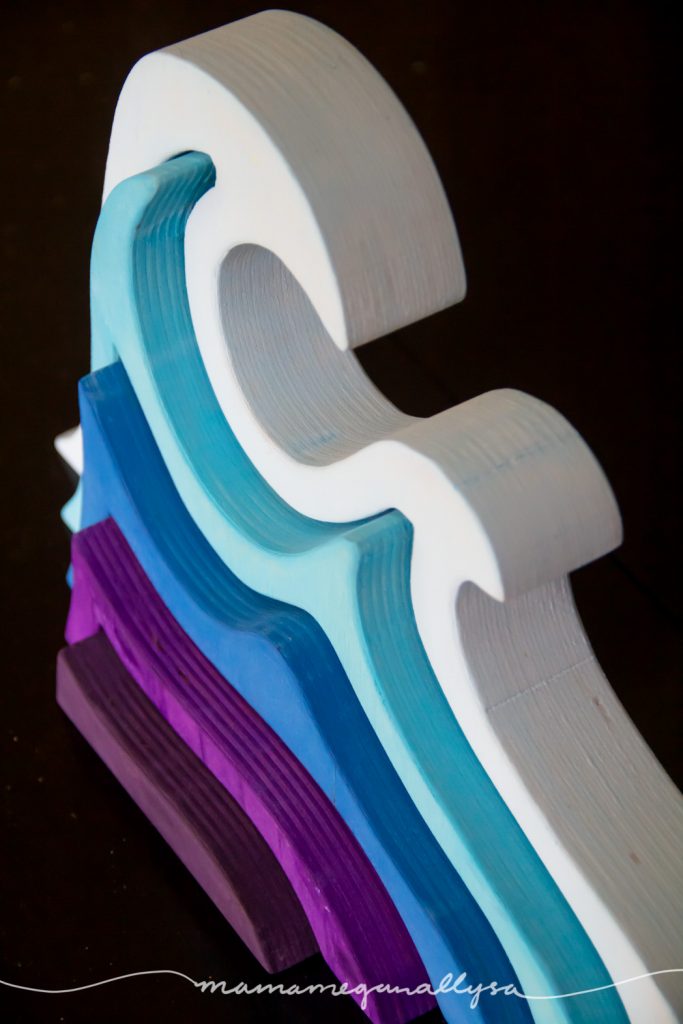
Zak was terrified of this one and it really wasn’t as hard to cut as he thought it would be!
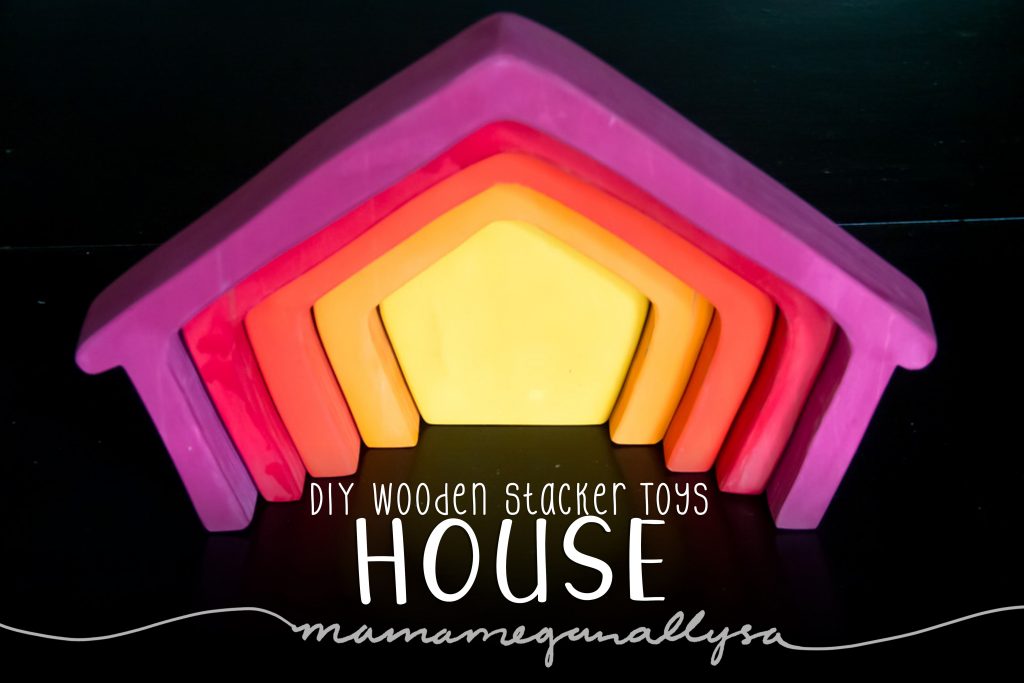
The House
I love that this can be a house or a barn based on what animals and things are with it
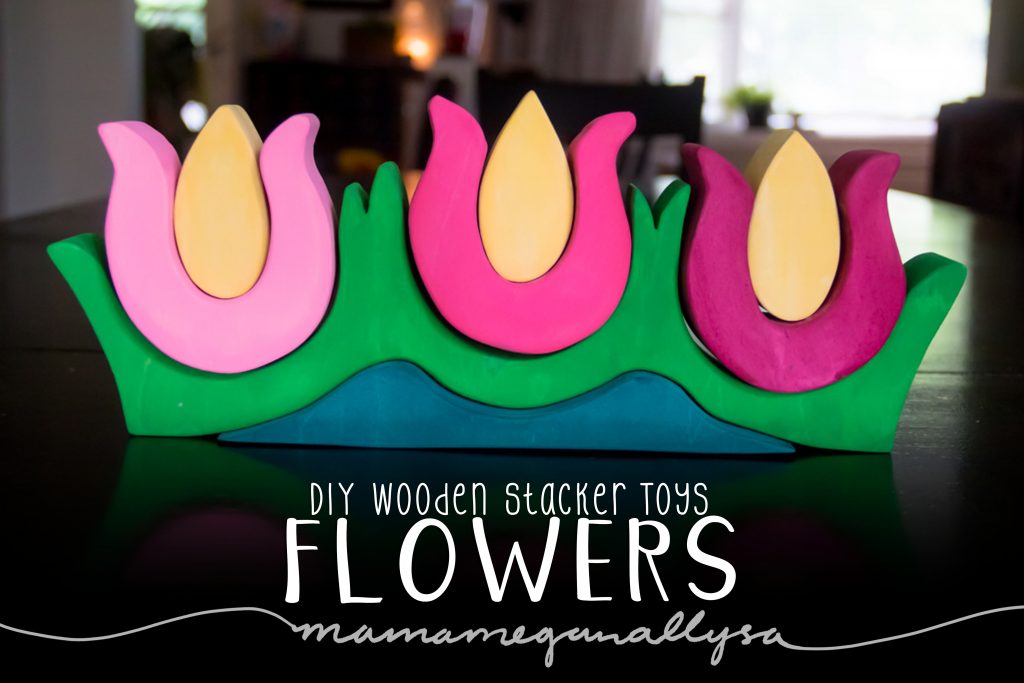
The Flowers

This was an entirely custom design created by my sister, I asked if she could think of a way to do some flowers and she said ‘give me a minute’ and less than ten minutes later we had something to work from!
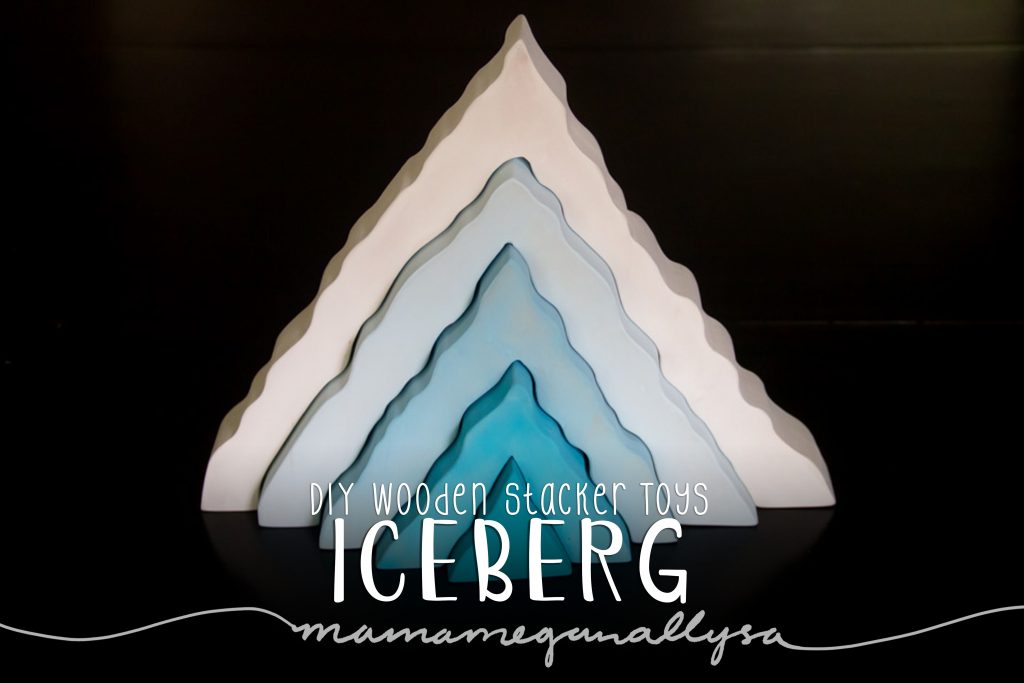
The Iceburg
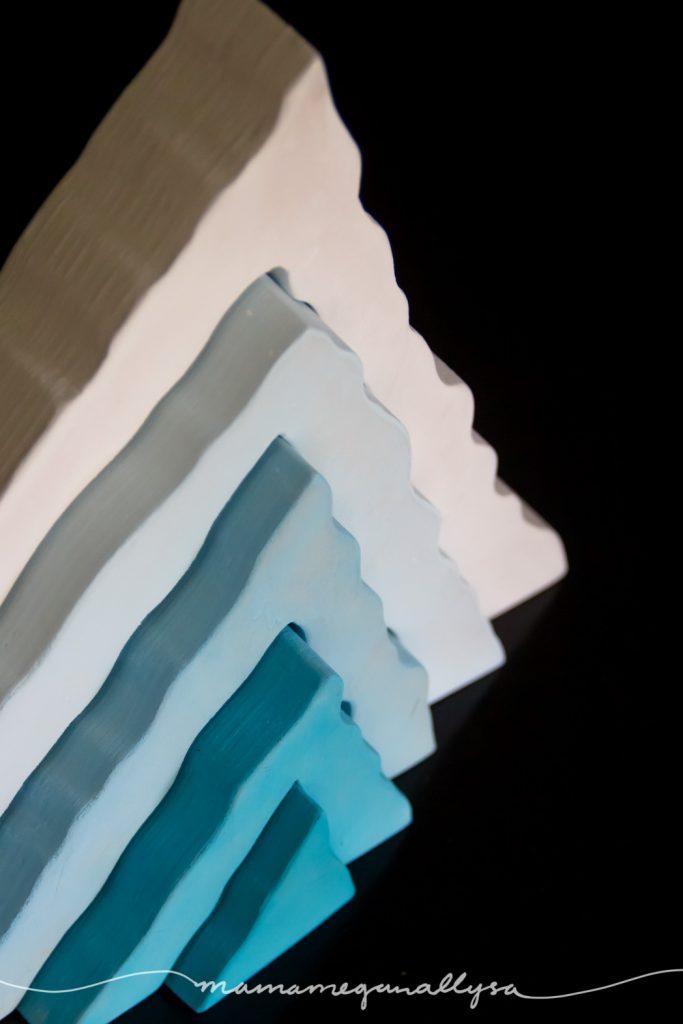
I really like the jagged edges on this one. Also, it was the most forgiving as far as cutting went. Mistakes were just now part of the ice!
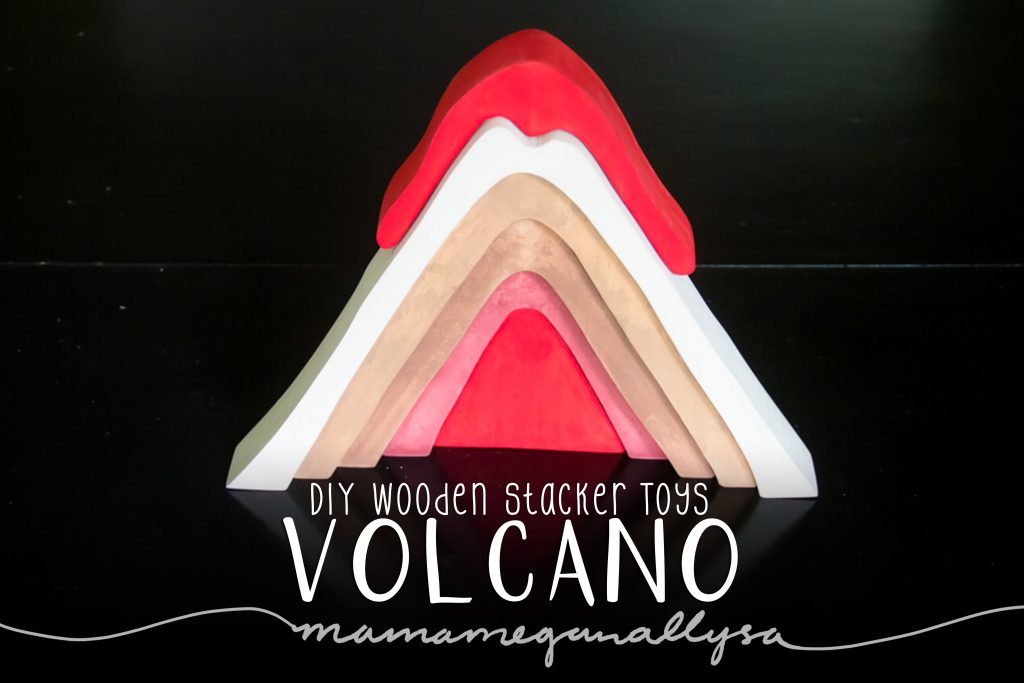
The Volcano
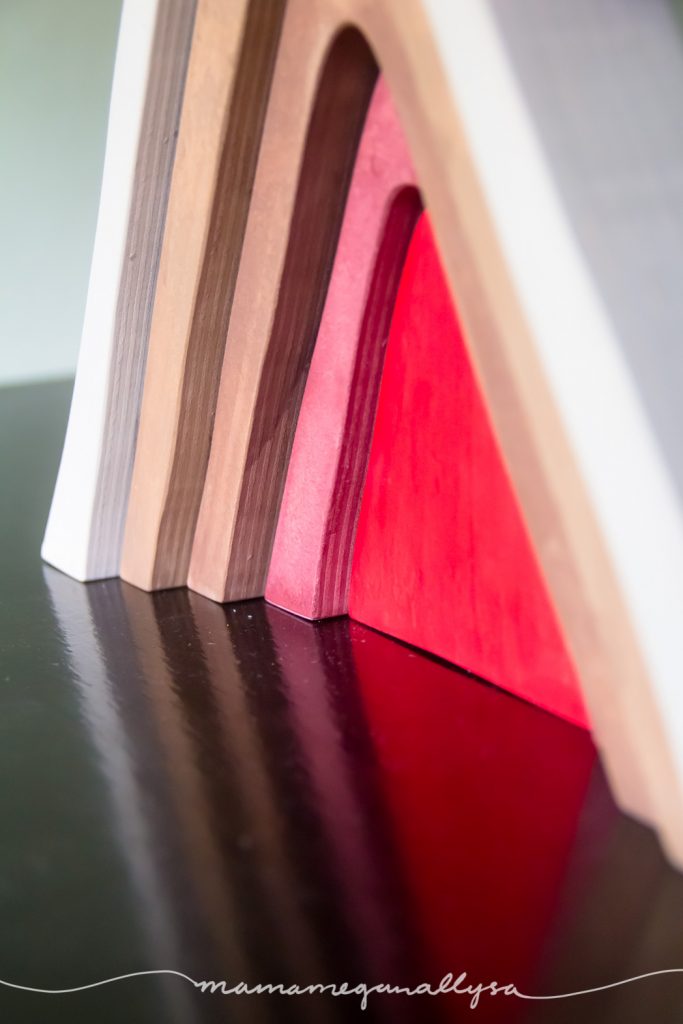
The lava at the top is removable so that the volcano can be dormant and erupt whenever we want!
IT TOOK FAR TOO LONG BUT PATTERNS ARE FINALLY HERE!!!
Are DIY Stacker Toys Really Doable for Everyone?
I would be lying if I said that these were easy and that anyone could make these. You need a hefty shop and lots of time and patience. But it is possible, if not by everyone…but honestly, that’s the way with most woodworking projects!

My next attempt will be a rainbow I think. We have our Grimms rainbow but I just think it would be fun to try and make a sunset one. What other kinds of stackers should I try? I would love to know what you would make if you could! Leave your ideas down in the comment section!
Please if you love these as much as I do share them. I am so proud of them and I want to shout it to the rooftops!
Other posts you may like


These are gorgeous! Well done! I hope you are planning to sell some. I love the removable volcano lava! So clever!
I would LOVE to sell them but there are lots of hurdles for selling toys!
Sell it as Montessori toys this is so great!! You r amazing
Thank you! I would love to sell some but there is a lot of red tape in the way when it comes to toys! I need to do some more research there first!
What are the measurements on the completed pieces?
Each is a little different but the max is 15 inches wide and 12 inches tall.
Do you have the templates available? Would love a copy!! Currently working on some wood projects for my Kinder class.
I do not currently. I created a custom size so they would fit on the shelves we use. I could maybe find a way to make a template but It would have to wait a bit so I have access to a larger scanner!
Hi there. Did you ever end up sharing these templates? Or can you share how you made them?
I have not yet shared the templates yet, I hope to get something together this spring hopefully! If your interested in making your own all I did was design what I wanted and sketch them out on some larger paper. After I was happy with the design I made a couple of copies (just to be safe) and then just glued the copies to the wood. It really was the simplest part of the process really! lol
Wo bekomm ich die Vorlagen her?
I sell there here on my blog in the shop section!
Can you make a template by tracing just the piece together?
I could but the problem lies in their size. They are larger than a standard sheet of paper so I would need to find a way to split the template into two halves. I also wanted to clean up the templates a bit if other are going to use them!
Did you seal them with anything? Or is this how they look after acrylic paint?
I did not seal them. This finish is just from the watered-down acrylic. Its held up great so far!
Hi. How much water to paint ratio did you use? Thabks
I went with a 2:1 water to paint ratio! You could go with even more water and you will likely still be just fine it you want!
A tip for removing templates that I got from Steve Good at Scroll saw workshop. Put a layer of blue tape across the whole surface under your pattern, then contact cement the pattern over the blue tape. It stays on securely and peels off cleanly when you are done.
That’s a great idea! I will totally be using that for future projects! Thanks!
I just use carbon paper and draw it straight into the wood. It sands off easy too. For painting I use acrylic inks which are waterproof when dry https://m.facebook.com/Burnin-Design-239074756785642/
I have never heard of acrylic inks. Totally looking into those! Thanks!
Hi!
I’ve been eyeing the Grimm stackers for so long and I love your idea of doing them ourselves. Your work is lovely! I have a scroll saw that is just begging for attention… though I’ll have to wait till after the baby comes in two weeks 😛
I wanted to suggest graphite paper for marking the wood with your pattern. When I burn designs that I draw on paper into wood, I trace it on graphite paper. It usually tends to erase or come out with wood conditioner before I stain or paint.
Thanks for the idea,
Neeli
I haven’t ever worked with graphite paper but I have heard of it. I will have to try that out soon!
I would also be so appreciative of templates! I have the tools, but very little artistic capability. These are just so fantastic!
Thank you! I just need to figure out a good way to do the templates, getting things from paper and pen to digital is a whole other beast!
For making templates, there are free scanner apps you can get that show you too take a picture of any size document, and then export it as a PDF or jpg. If you know the size of the original paper you can resize the scanned document to match the original.
I had no idea these even existed! I will look into it for sure! Thanks
Wow! I am beyond impressed with these! Great work! I bought a scroll saw over the weekend to try it myself, but I don’t feel as comfortable with it as with a band saw. Ugh…wish me luck!
I have yet to work with my scroll saw! Its sitting in the shop mocking me every time I walk past it. (to be fair I haven’t been in the shop much this summer, so it hasn’t had too much opportunity! lol) Good Luck! I would love to see what you make!
Have you tried paraffin oil (mineral oil in the states) as sealant. I use this on my wooden toys over acrylic paint. Very easy to work with and food safe, think cutting boards.
I was under the impression that most oils just conditioned the wood not sealed it and they would need reapplied after handling for a while. I know we have to re-oil our cutting boards. I will have to look into it more. Thank you!
I love it once folks close and share opinions, great blog, keep it up.
Dang! Fully expected the templates to be part of this post! So we have to design them ourselves?
I am in the process of making the templates but at this time I don’t have them available. Sorry to disappoint! I found it fun to design my own, and make them a little different than the other options available, give it a shot!
I bought some unfinished stackers on Etsy and I’m in the process of dyeing them with Keda Wood Dye. It’s not too expensive- $17 on Amazon and you mix the colors. Although, it is very tricky. I still haven’t sealed mine but I know I need to.
I thought about using acrylic but I was afraid of loosing some texture of the wood. Can you still feel the rough wood? It’s important to me because I don’t want them to slide around when building.
That’s also my problem with sealing it. I may use a beeswax/mineral oil combo….but I might just try something from home depot too.
I will look into those for sure! With watering down the acrylic you are able to keep the rough wood texture! So no slipping or sliding! Beeswax is a common addition but from what I have researched its something that will wear off over time and need to be reapplied. I think mineral oil would do the same. I know I end up having to re-oil my cutting boards, but they are getting washed more than toys would be so maybe mineral oil would be alright!
Great article! Check this out. What’s your opinion on Grizzly drum sanders? I’m in the market for a new one for my home shop. I’d only be using it for a few hours a month. I really appreciate any advice you can give. 😀
Those look really impressive! I’ve never used a sander like that. I use a smaller belt sander and barrel sanders, as most of the time I am dealing with smaller parts so I like to be able to use the edge of the sandpaper at different angles to get into all the nooks and crannies. Good Luck on your hunt!
So nice! Do you mind if your design is used as a template? I’d like to try making one as a Christmas gift.
By all means your welcome to! I would love to see what you end up with! Tag me on Instagram at mamamegan_allysa
Wow these are just beautiful and amazing! Look fantastic. Let me know if and when a diy template is available for purchase.
Thank you! They were definitely a labor of love but worth the work in my opinion! I will let you know when I manage to make the templates!
Will you be making your templates available? I was brought here by your diy amazing ness. I would try to design my own but I’m just not that type of creative
Currently, I don’t have them up anywhere no. Possibly in the spring of the new year if I can figure out a good way to do so!
Those turned out beautifully! You mentioned you did 2 layers of the plywood, how thick was each layer/ how thick is the final thickness? Thank you!
Thank you! I can’t recall exactly, but I think they were 1/2 inch. The finished thickness is about an inch I would say!
You should try liquid watercolors. They work great on wood. They sell at Lakeshore school supplies.
I would love some liquid watercolors. They have been on my list for a while, and I just haven’t committed!
I use Krylon easy tac to adhere paper templates to wood for scroll sawing. Adheres well and pulls right off when done. I recommend you spray it outdoors. Follow the instructions carefully!!!
Available at craft stores or online.
If I end up doing more scroll work I plan on doing some more research or prep work on this step for sure! The sanding took forever!
I found out that Rit fabric dye works beautifully on wood. You just have to submerge them for 20 minutes in the dye let it dry and its done. These are so cool, might have to be my next project!
Thanks! I really love them! I honestly hadn’t thought of using Rit. Do you dilute the dye any or leave it at full strength?
From my looking in the internet I thought using acrylic paints were potentially toxic for small children and toddlers if ingested? Toys always end up in mouths. Is that true for the acrylic paints you used? What brand did you use? Thanks for the help and looking forward to templates in the future as well.
There are non-toxic acrylics on the market if you are concerned about this. I am unsure of any brands personally, but I do know they exist. There are other products you could use as well as such as food dye or natural dyes, but I can’t vouch for them as I have never used them. My daughter has never been much of a mouther, I also didn’t introduce these until she was 1.5 and I was confident that she would keep them out of her mouth. So I personally was unconcerned with this aspect. The paints I used were a variety of just standard craft store acrylics.
I’m curious about your colour wheel and the colour sheet in one of your process pictures…did you make it? How do you use it?
I did make the color wheel! It’s mounted on a lazy susanne and is used for color sorting and just general loose parts play. You can see more about it here https://mamameganallysa.com/loose-parts-tools-simple-additions-to-spark-creativity/
The color sheet I think you are referencing is just my color swatch sheet. I swatched all of my paints so I could decide what ones I wanted to use as well as a reference for me if I needed to buy more paint!
This is amazing!! I can’t wait to try it! I think I am going to try it with a CNC machine that a friend of mine has! Hopefully it works and makes the process a little easier!
I know almost nothing about CNC machines but as long as it can cut through thick enough wood then I bet a CNC would do be awesome at this! Good Luck!
I love the way your colors came out what water paint ratio did you use?
I used a 2:1 ratio of water to paint.
Easy Pattern Transferring***:
If you PHOTOCOPY your hand-drawn designs or design digitally and LASER print, there is an easy way to transfer your design. Place your paper printed side down on your wood. Heat the paper with a household iron and the toner will re-melt and transfer to the wood. Carefully lift a corner of the sheet to see your progress and judge when the process is complete. If you cut on the line, there will be no trace on your finished project. Lines near imperfect cuts can be quickly sanded off. This same technique can also be used for transfer to fabric or other heat-resistant craft materials.
***Note that your cut will be the mirror image of your printout, so if there is a right/wrong side to your wood, take that into account particularly if you are doing letters or numbers. Most software (even Word and Google Docs) offers options to create a mirror image of your design often in the drawing or image options. Some photocopiers also provide a mirror image option in their advanced settings.***
Wood:
For people worried that certain finishes might be toxic, you may also wish to avoid plywood. Plywood consists of glue sandwiched between thin sheets of wood. When using plywood, you need to be aware of the potential chemicals in the glue and the increased risk for splinters. Solid wood is a better choice if your kids will be putting these in their mouths. If not, weigh the risk vs. your budget.
These are beautiful! … Just bought a second hand scroll saw today to make some items for my kindergarten class. Any chance you have created templates yet!? lol … Great work!!
Not yet! I am working on it but life is super busy right now. I really enjoy working with my scroll saw. Good Luck!
THANK YOU for the informative article! I’m in the process of transitioning my in-home daycare into a Montessori style environment, which in my mind, consists of many open ended stations that require these type of toys. I’ve been researching for a while to buy such type of toys but they can be seriously expensive. So, like you I want to venture in trying to make my own. Thank you for your article! It is a starting point for me to see if I too can make my own toys. Thanks again!
So glad to help! It’s a bit of a rabbit hole once you go down it though. Be forwarned! lol
Hello! Obsessed with these beauties – really nice work! Two questions – why do you water down the paint and also – I’m assuming you’re referring to Baltic Birch plywood? Wondering what thickness you used? Did you glue them together and then cut them or cut same design twice and hope they fit together perfectly?
Thank you! I water down the paint so that it soaks into the wood more and leaves more of the wood grain showing. I also allows the wood’s texture to remain and makes stacking a little easier! Yes Baltic Birch plywood, but you could use any higher quality plywood or even try and source some thicker chunks of solid wood. I used 1/2 inch but you could go thicker and the end piece would stand that much better. You glue first! I cut the large sheets down to rough size and then glued those smaller pieces together. Once the glue dried I cut the design out of the smaller pieces. Hope that helps!
I just got a scroll saw and am doing some research before deciding my first project! I love these. I like the volcano, wave, and house ideas the best! For other wood projects I have used The Dishwasher Safe Modge Podge and there is also Outdoor Modge Podge, both good water proof sealers and non-toxic! The wood texture also still remains. I have also seen others use shellac (not sure if someone already mentioned in comments) which is made from bugs and supposedly safe….but what worries me is that it has the California warning that it contains cancerous materials…so idk! Maybe it is safe when fully dry but the fumes can be harmful? But I will probably stick with Modge Podge.
I have heard more and more people mentioning Modge Podge and I honestly never even considered it! I will have to check into it for some new projects in the works!
I also just got a scroll saw and I’ve been using modge podge to finish everything! It’s great for me bc I normally finish in the house and it doesn’t have as many fumes as other finishes. I do a few light coats. It also dries super fast!
I’ve been hearing lots about mod podge as a sealer lately Im working on another loose parts set that I might have to try it out on!
Hi. Did you paint them with a brush or did you dip them into the paint? I tried making some and I find in painfully slow to brush it.
I brush painted them. You would have to make up quite a large tub of paint to dip them. With the watered-down paint I actually felt like it was super fast to paint!
These are gorgeous, I keep visiting the post hoping that you may have managed to find a way to share the templates with us.
would you please consider sharing the templates for these beauties, I really would love to prepare them as a birthday gift for my twins.
And thank you so much for the detailed info
I’m so glad you like them! I have been so busy I haven’t had the chance to clean up the designs yet but I haven’t forgotten! I hope they have a wonderful birthday in any event!
Megan.
buenos dias!
Recibe un saludo desde Cali-Colombia.
Eres muy creativa, original, curiosa, y diria…. que en este oceano de propuestas para juguetes de niños; te destacas sobradamente con un estilo muy propio.
Realmente inspirador y admirable!
Gracias por compartir, desde el diseño, hasta su creacion.
Bendiciones para ti, que enseñas, educas y compartes!
Thanks for sharing this, Megan! I don’t have anything to add or ask after reading through the comments, but just wanted to drop a “thank you” for your labor. 🙂 Have a good day!
Just checking back for the templates lol
Yes, life has been SO hectic! I am working on them at this very moment! I hope to have everything up and available by the ned of June if not sooner!
Ahhh i need these in my life!! any templates?
I am literally working on that today!!! It has taken me WAY too long to get them finished and organized, but they are on the way with a few other fun little templates!
I’ll be checking back all day 🙂 so beyond excited
How about a sunflower stacker. It would be under the same type of design as a sun. Just color to look like a sunflower.
I actually have a sunflower design sitting here waiting for me to upload it!
How thick was the Baltic birch that you glued together? Very nice. My daughter wants me to make some for her. She is a teacher.
The finished piece is about an inch and a half so each sheet was 3/4! Hope that helps!