
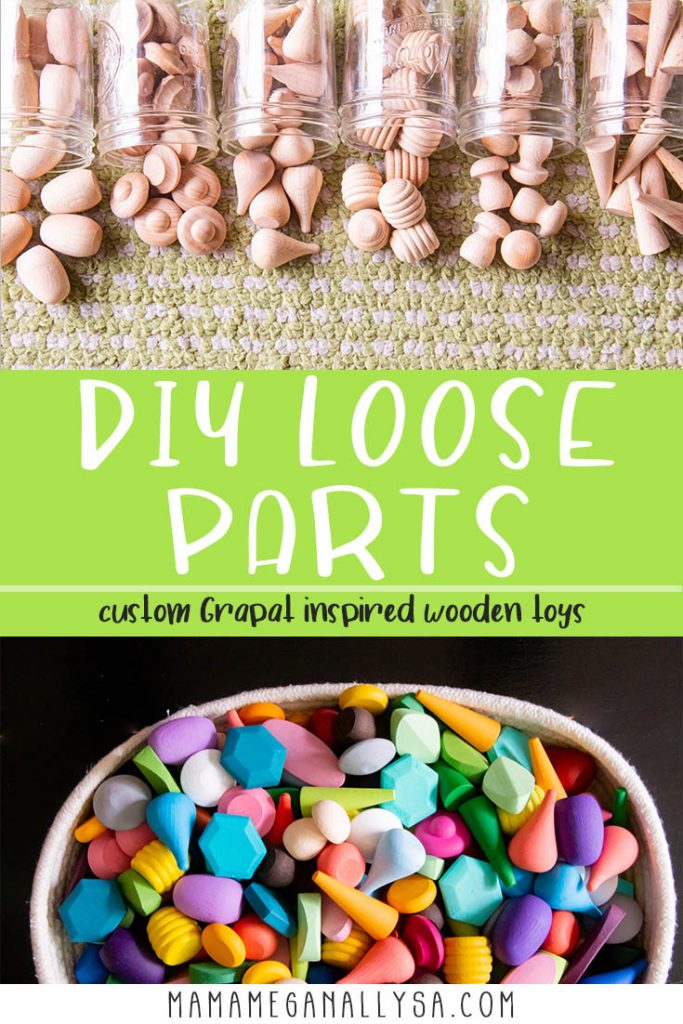
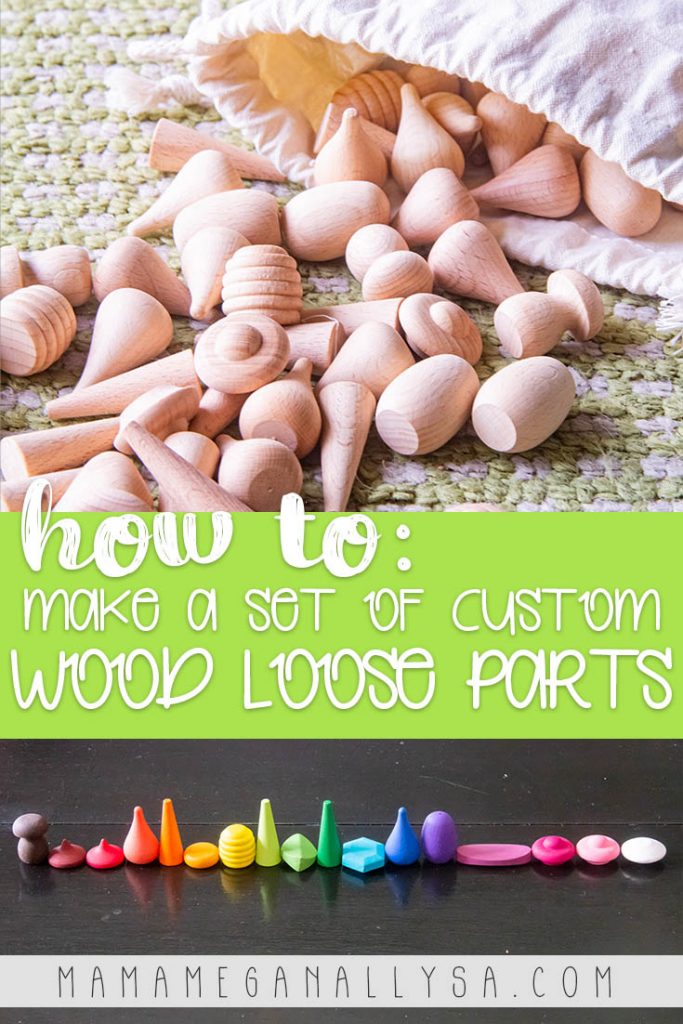
I like a challenge. I love a good DIY. If you can make it a rainbow, I’m all in. My Custom Wooden Loose Parts were all of these things and more!
Let me tell you a story. It’s a rather long story, so grab a drink and get cozy.
I got the idea more than a year ago now, to paint my own set of custom wooden loose parts.
If you’ve been around the wooden toy internet much, then there’s a very good chance that you have seen the Grapat mandala pieces. They’re beautiful, beautiful pieces. They can be a little tricky to get your hands on. They often sell out fast, because they’re a smaller manufacturer with lots of hand-painted goodies. They’re quality open-ended toys that I really do suggest you look into investing in especially if you’re not the DIY type or you find sourcing the materials a little too frustrating!
I personally didn’t want to wait to have the full set and like I already established I like a challenge and the idea of finding a way to create a set of custom wooden loose parts was right up my alley.
I have a post already all about my rainbow set of coins, balls, rings, and peg people. These are all great open-ended toys that we love but I wanted to try my hand at some mandala pieces.
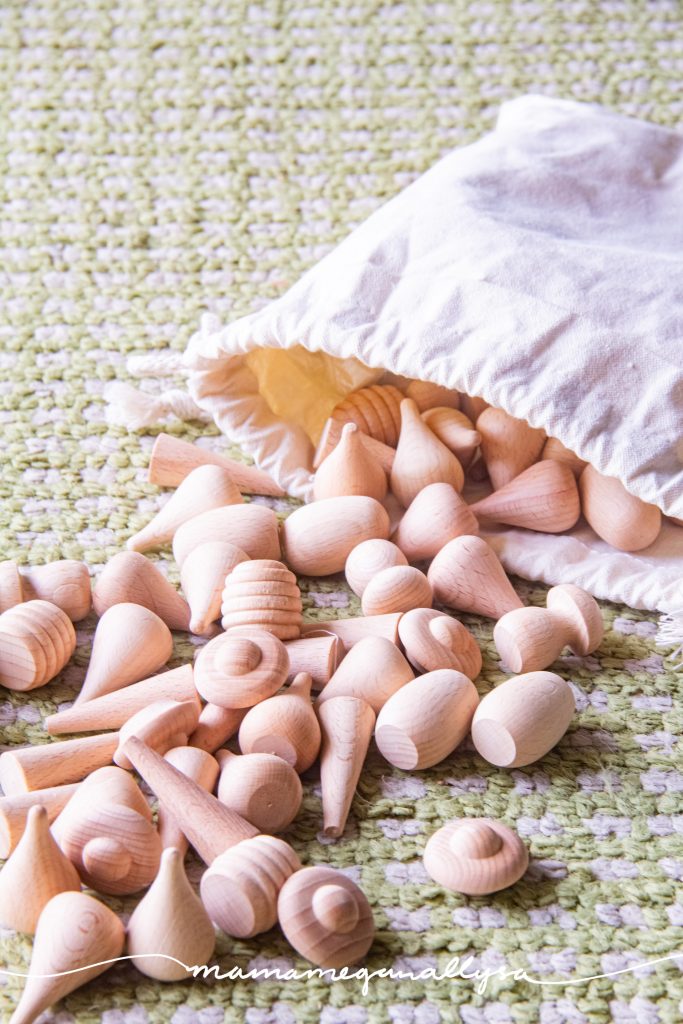
Sourcing unique wooden parts is a little harder than you think it would be…
Once I decided to take on a set of custom wooden loose parts, the first step was trying to source the individual raw wood parts. Here’s where we hit a bit of a snag.
If you’re attempting to make a dupe of the Grapat set you’ll find that some of the styles of mandala pieces are nearly impossible to track down. At least that was the case for me. I searched the internet high and low for wooden bits and bobs and was coming up short.
This post contains some affiliate links. As an Amazon Associate, I earn from qualifying purchases. I may receive a small commission from if you follow and decide to purchase. There would be no additional cost to you!
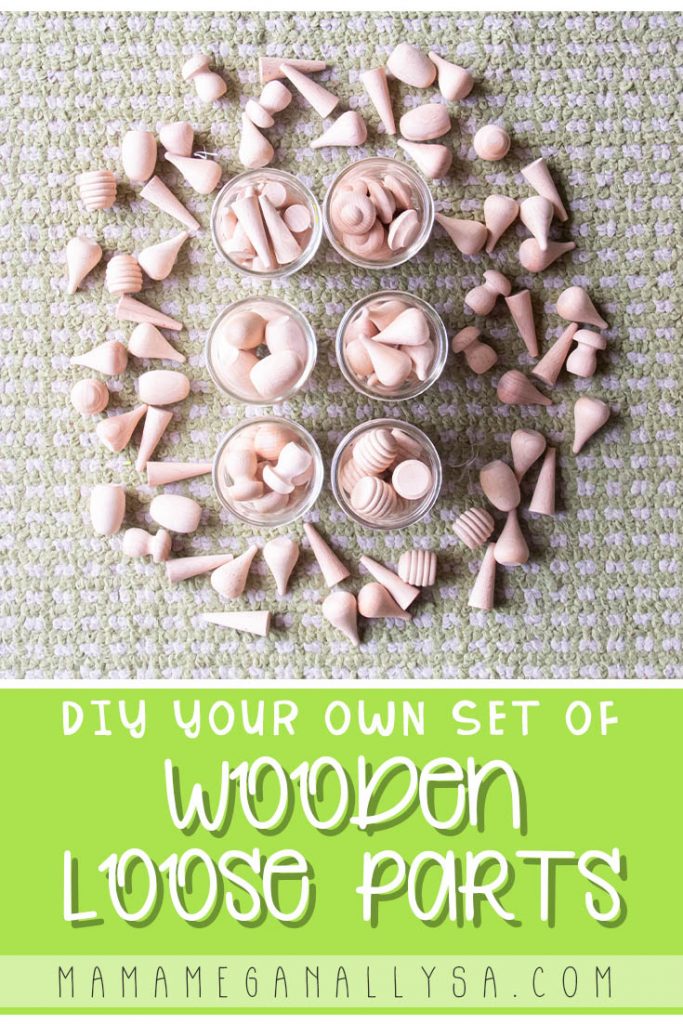
Here’s what I did manage to find that will get you as close as possible or at least has a very similar vibe
- Red drops
- Orange cones
- Yellow hives
- Green cones
- Blue chips
- Blue drips
- Purple eggs
- Pink flowers
- Brown mushrooms
- Black stones
I have linked mostly Amazon and Esty above for your added convenience, but if you’re looking for better control over the quantity and dimensions you are going to want to go with a wholesaler. You may also some other unique pieces that you fall in love with! I like Casey’s Wood the best, but I have also shopped with Woodpeckers Crafts and Craftparts.com
Since my original search, things have improved in wooden loose parts search and they have proven a little easier to find and in fact, if you search Etsy you can find unfinished sets of wooden loose parts that are nearly, if not identical, the Grapat line
There is also a company called TickiT that has an entirely original set of wooden loose parts…and I am still actively trying to convince myself that I do not need their set…
I will link them here if you are interested in making your own set of custom wood loose parts without all the stress of sourcing the parts! They also have a great jumbo rainbow set (already painted) that would be great for a home with babies. Just had to share!
If you get stuck, it never hurts to ask friend for help
After scouring the internet for many hours I was really getting stuck as to how to source the pieces for my custom wooden loose parts. I was not finding exactly what I wanted and I just wasn’t ready to pull the trigger on anything I was finding.
With a little bit of direction from a Facebook DIY group, I landed on AliExpress. I normally don’t like supporting websites like this…but it had exactly what I wanted. A raw wood set of mandala pieces that happened to be identical to Grapats.
Now I wasn’t per se looking to identically dupe the Grapats, but I was looking to try and source the cones and the drops specifically and I was having a very hard time finding those two shapes.
In the end, I decided that a half set was more than enough for us as I had the intention of still finding a way to make a set of custom wooden loose parts.
Enter in phase two of custom wooden loose parts – getting crafty
With my many hours of searching for unique wooden bits and bobs, I landed on Etsy where I found a bulk wooden bead seller. This is the seller I found but you could honestly just search wooden beads and you would find plenty of options!
I think you can see where I’m going from here…
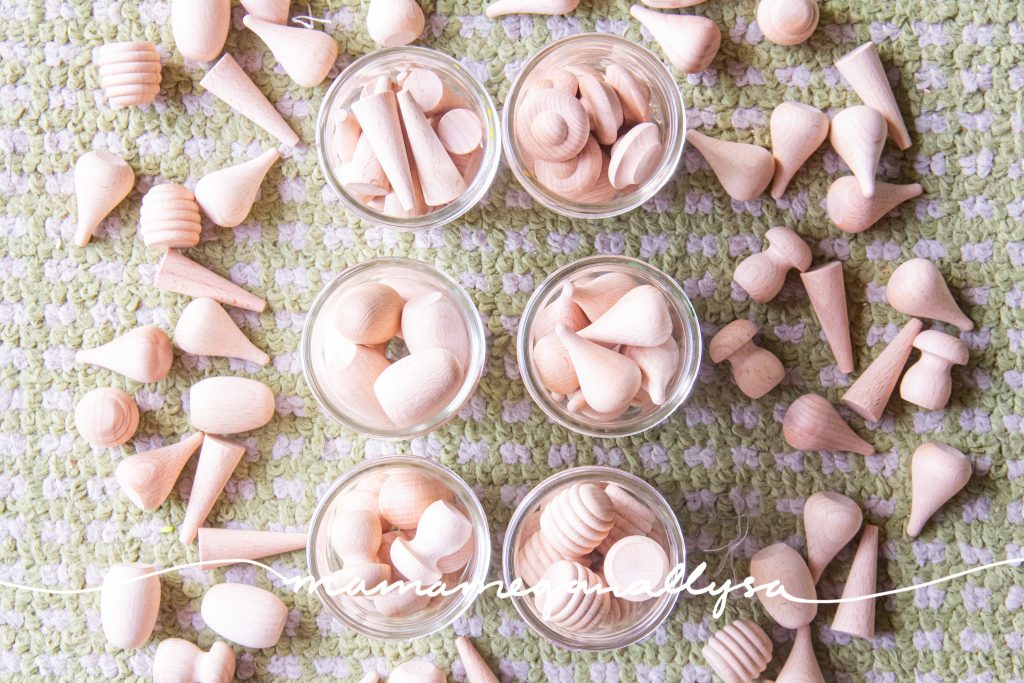
I scoured their listings for unique shapes that I also felt would still be large enough and would mix with the other wooden loose parts and feel at home.
Okay but, How Many Bits and Bobs do you Need?!
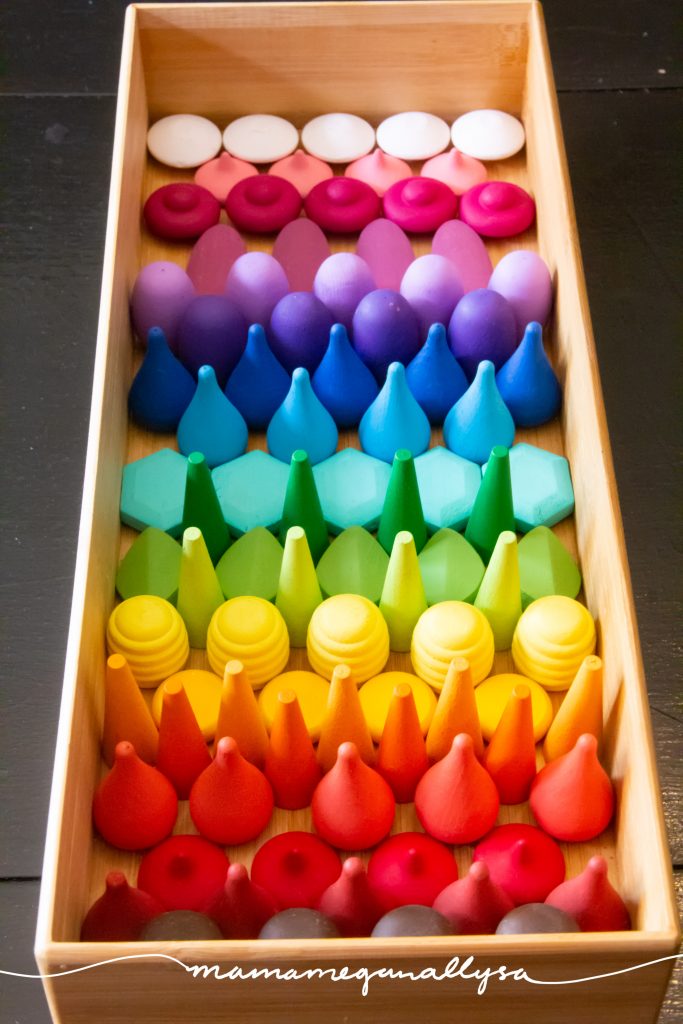
A standard half set of mandala pieces includes 18 pieces for each color/style. But considering this is a custom wooden loose parts set, you can have as many or as few as you’d like. However many you decide you will want to make, be sure it is a number divisible by 3. This will matter in the painting step.
You can have as big or small a set of wooden loose parts as you like. I would say I wouldn’t want to go any smaller than 9 for any individual color. This way we have 3 of each of the three tones you’ll be painting.

Now it’s finally time to purchase your wooden loose parts…
Now we wait. Both of my orders were coming from China and if you’ve ever ordered anything from China you know that you cannot even begin to predict the shipping time. It could surprise you and be there in a week, it could take 3 months, it could take more. you will literally never know and you just have to wait. I was incredibly lucky and my Aliexpress order came in a couple of weeks and my Etsy order came, I think, within a month.
Go Bigger than you think…
When I ordered my beads I did not have the set of wooden loose parts yet and in the end, I was unable to use quite a few of the beads I purchased because there were too small in comparison.
A good size to aim for a custom set of wooden loose parts would be no smaller than 1 inch and no larger than 2 inches.
Okay on to the actual tutorial I guess : How to make a set of custom wooden loose parts!
Once you have all of your little wooden loose parts on hand you’ll have three simple steps
- Fill holes
- Paint
- Seal
Now depending on what wood parts you are able to source you may be able to skip step one. There were a couple of things that I could find online that did not have holes so it is possible if you want to make your life a little easier!
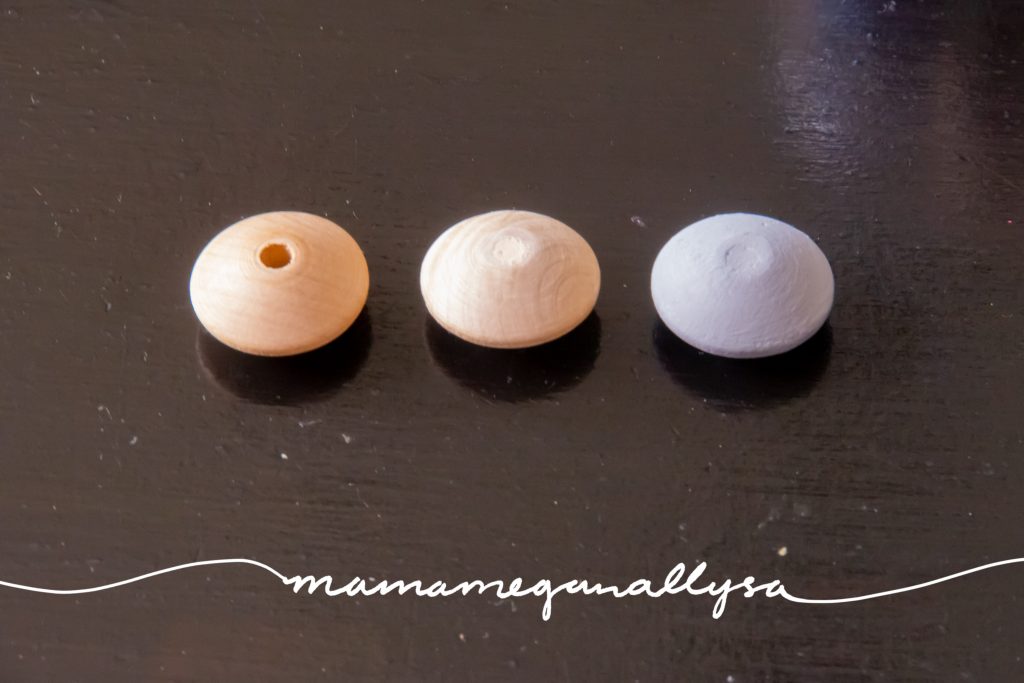
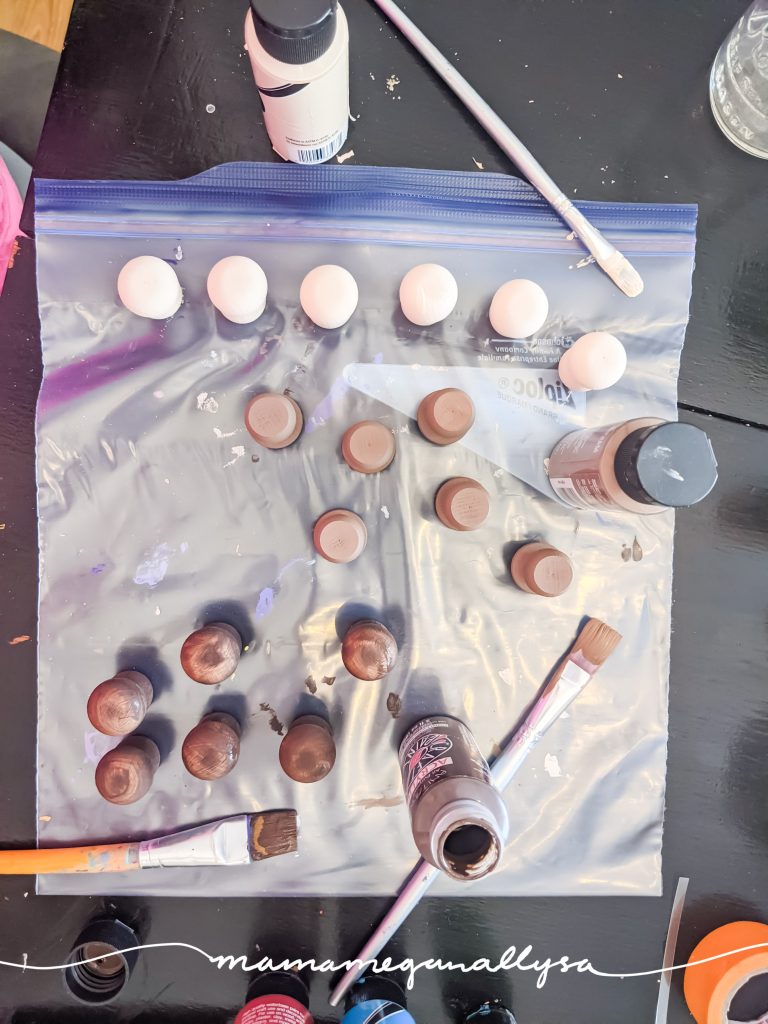
Step One – Fill and Sand your Custom Wooden Loose Parts
I used a simple wood filler. Oddly enough the nozzle of my wood filler fit perfectly into the holes for some of my beads and I was able to just sort of squeeze it into the hole and then smooth out the ends with my finger. Some of my other beads, the holes were too small and I just had to use my finger to sort of shove it all in there.

After all of your beads have been filled you will need to sand to smooth, because no matter how hard you try you cannot do wood filler cleanly, yeah at least not as cleanly as you would want for something like this.
Use a fine-grit sandpaper and just go to town sanding away until you have reached a smooth finish where the hole was.
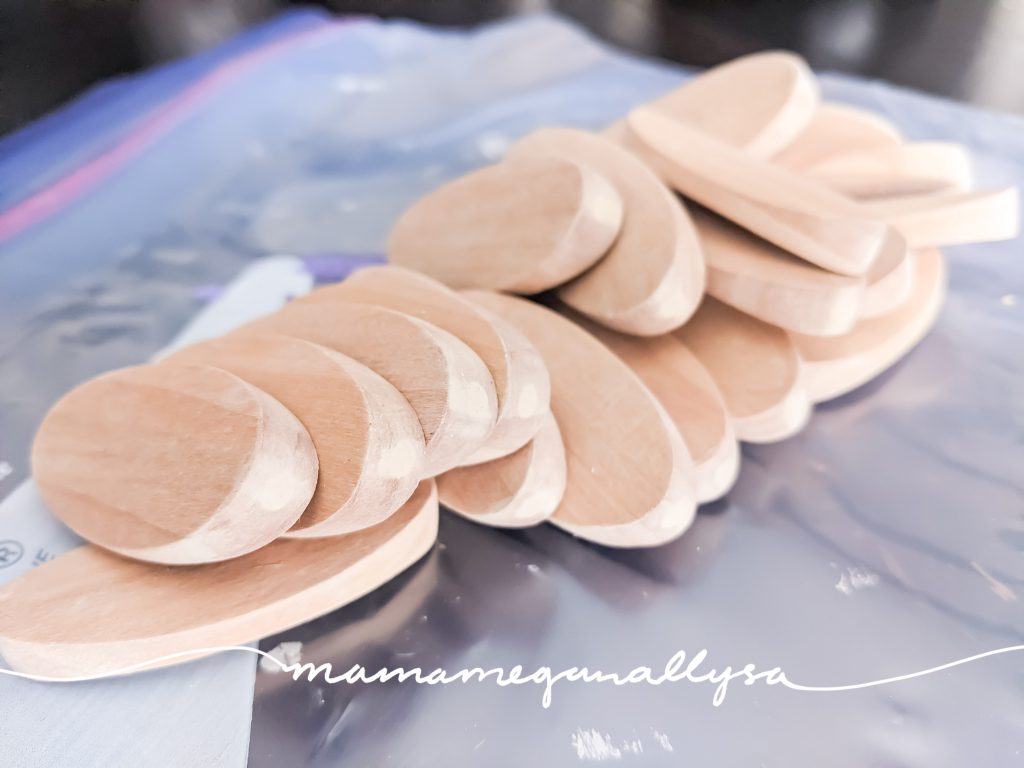
Depending on the size of the hole you may want to do a second layer of wood fill if you’re after a truly flat finish. I noticed on some of mine that had the larger holes, the putty sort of settles in as it dries and leaves you with a slight dip. I chose not to reapply as the slight dip actually gave the bead a better flat point to stand on
Okay, so your bead parts have been wood-filled and sanded now you’re ready for the fun part!
Step Two – Selecting a Color Pallet for your Custom Wooden Loose Parts
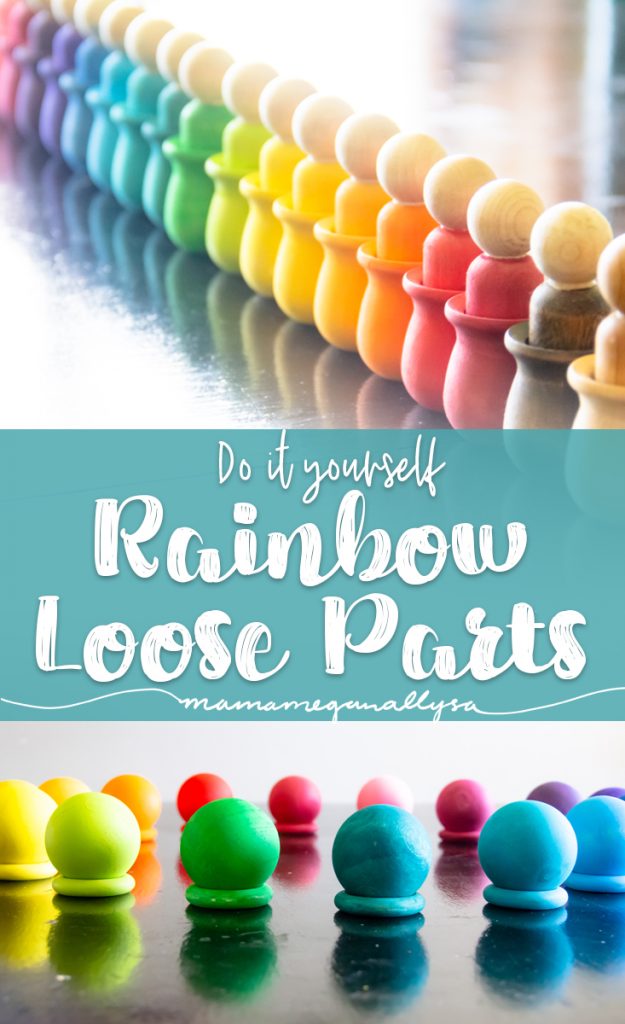
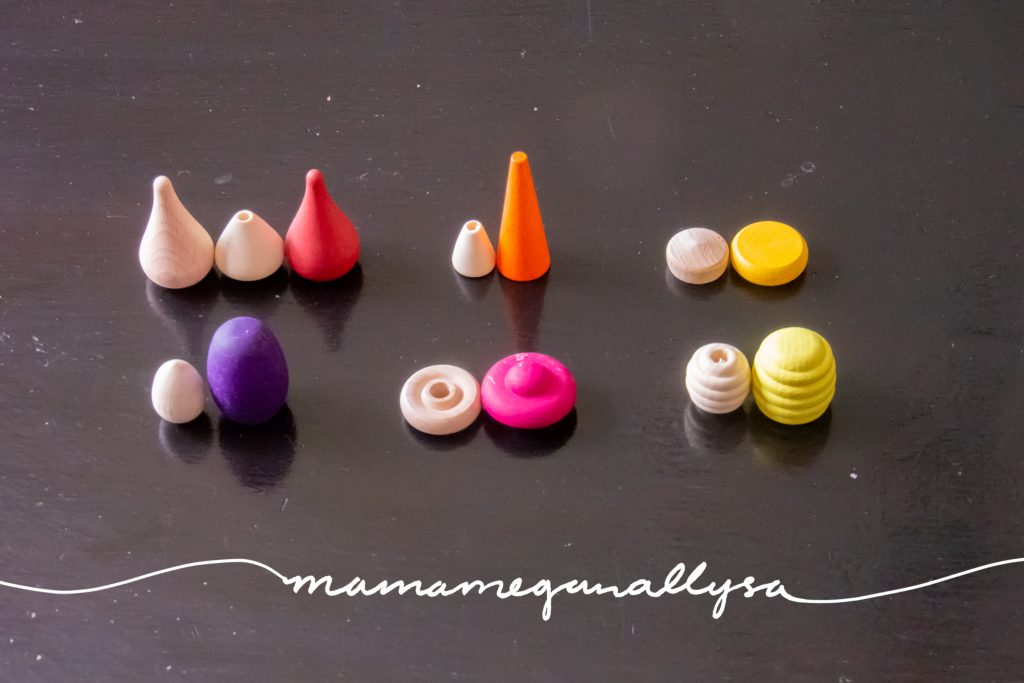
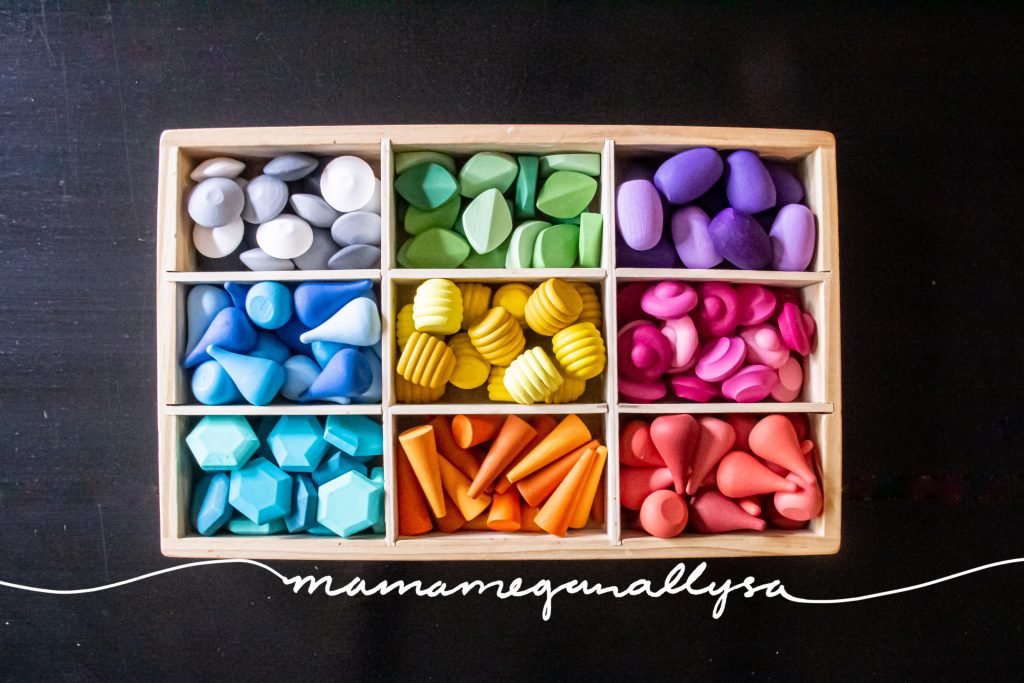
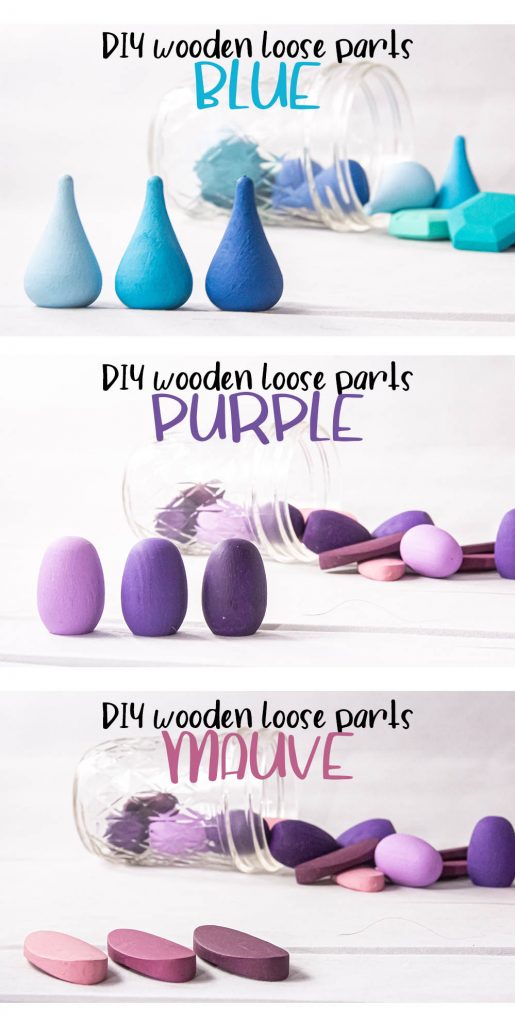
I am kind of obsessed with color. I knew without a shadow of the doubt that my custom wooden loose part set needed to be a rainbow and it couldn’t just be a simple basic rainbow. I had to include some of the colors that get forgotten. Teal, Mauve, and Coral. These are all beautiful colors and honestly, some of my favorites and they’re almost never included in traditional rainbows.
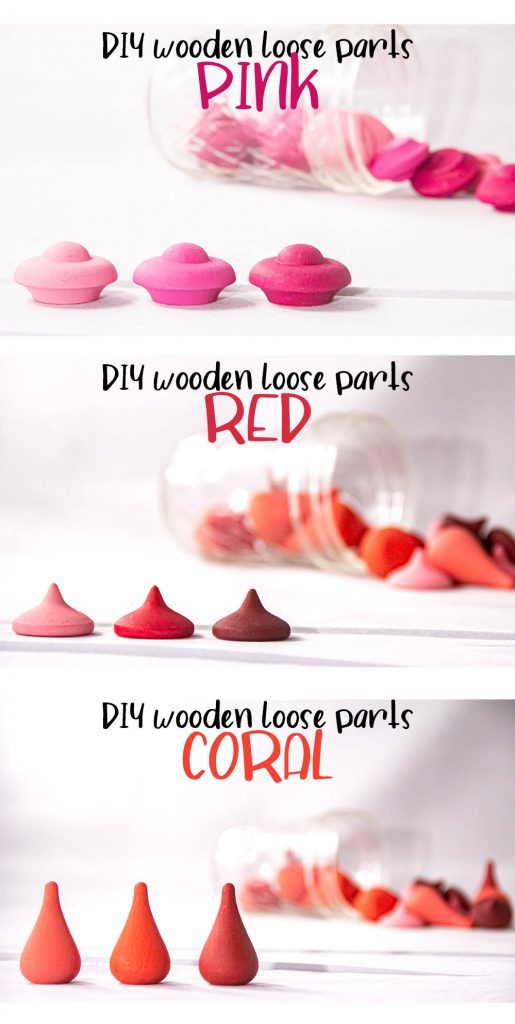
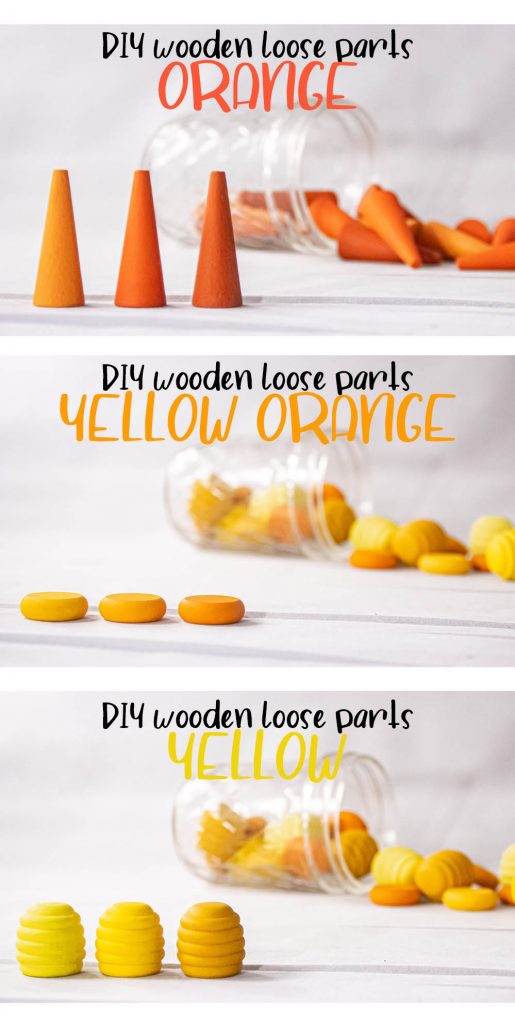
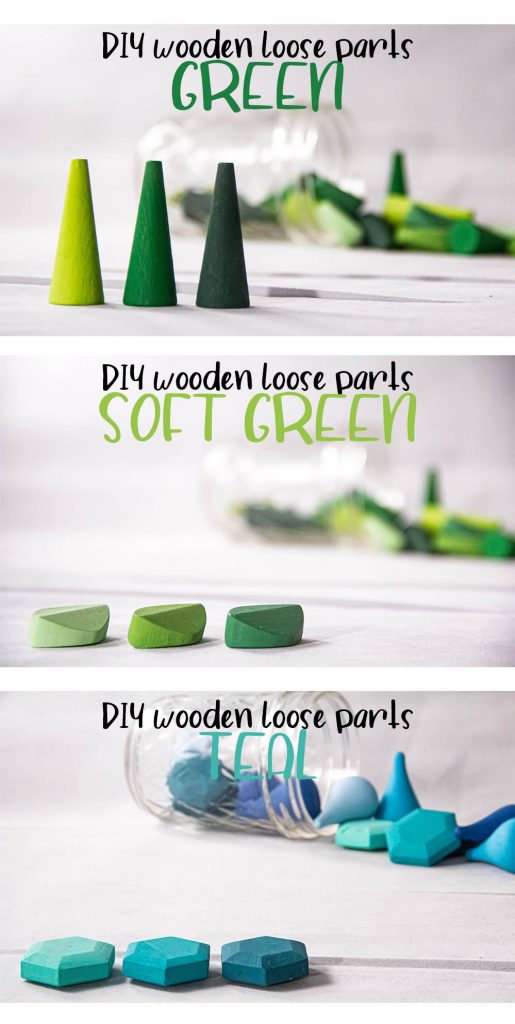
One thing that I do really like about the Gapat mandala sets is that each color comes in three tones. You have a light, a medium, and a dark. This is a great way to help kids become more tonally aware to understand the concepts of light and dark and it also just opens up more variety in your builds with your wooden loose parts!
So at this point, we have established two things: I love color and I love the tritone selection for each color.
Here’s where you have to make a decision: do you want to invest in a lot of paint or pick a basic rainbow and then pick up some white to achieve the tones?
It’s kind of up to you and what your preferences are. I chose to pick up a lot of paint. I knew that in my life, I would find a use for all of this paint and I knew that I had many many projects that needed paint. It was not going to go to waste. So I bought a light, a medium, and a dark in each color that I intended to include in my custom wooden loose parts set. This choice also allows for a little variance in the colors to make them stand out from each other a little more.
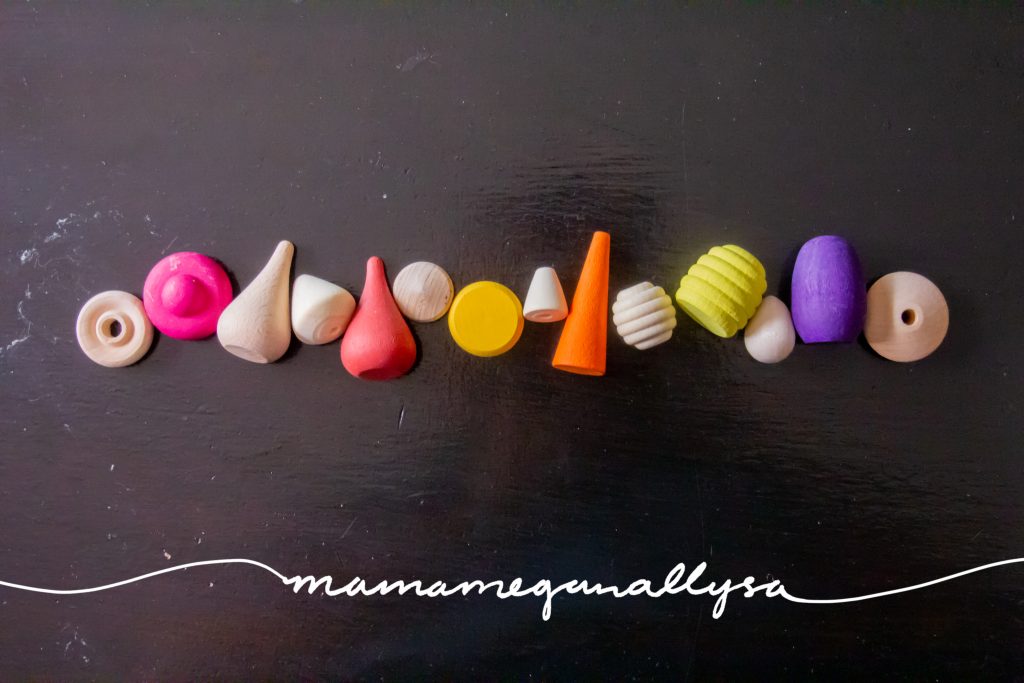
Here’s the paint I used for my custom wooden loose parts
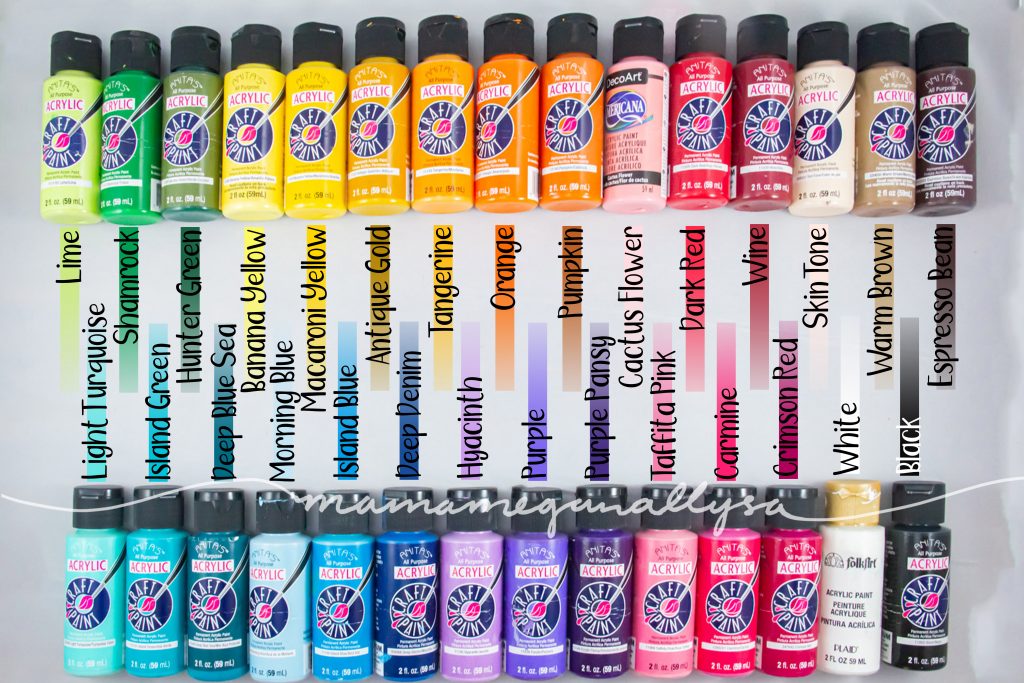
- Brown
- Red
- Coral
- Orange
- Yellow orange
- Yellow
- Yellow green
- Green
- Teal
- Blue
- Purple
- Mauve
- Pink
- White/Grey
Now, this might seem like a lot, but as we have already established I’m obsessed with color, and honestly, I have more colors I want to add…
It’s Never Enough for Me…
At this point I would love to add a good indigo, a warmer brown, I’d like to add another pink set and I’d honestly like to redo the red and purple set. As well as some pastels!

After hours and hours of painting, you will be left with a finished set of custom wooden loose parts and you will feel so accomplished! At least I did.
If your fingers aren’t covered in paint then you’re not doing it right!
Painting a wooden loose part set can be a little tedious. They’re small and there are lots of pieces and I can guarantee you you will not finish without copious amounts of paint on your hands. I suggest a good drying rack to set the pieces on so they cant roll…because quite a few of them will want to roll and take your time, do one trio of tones at a time and just chip away at it!
Step Three – Don’t skip it, It’s important this time!
Normally I am not one to seal my wood projects. I don’t particularly like the sheen that it gives. I prefer the matte finish of the paint. But this is one project that I do highly recommend you go ahead and put a sealant over your pieces.
Not even taking small children and slobber into account, these pieces are going to be tossed around and constantly bumped into each other. There’s almost no way that you will be able to store these where they won’t bump into each other and thus won’t transfer little bits of paint here or there. Now if that doesn’t bother you, more power to you, but if you’re the type that doesn’t particularly like to see big scratches of red and blue on your yellow honeycombs I suggest you seal.

You have the option to brush on sealant the same way that you brushed on the paint. I chose to be more efficient and used in aerosol sealant.
Even with the convenience of the spray sealant, You’re still going to want to make sure that you make an effort to cover all of the sides and edges. So set yourself up with a spray paint box and go with light coats as you will end up rotating and or turning your pieces more than once to get all the sides covered.
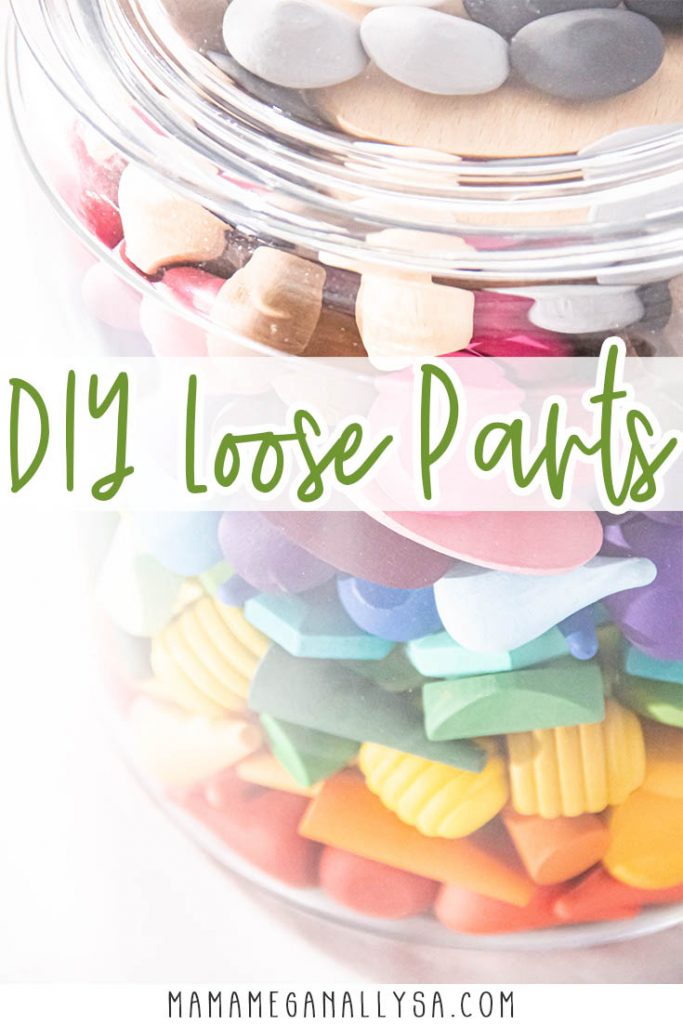
In the end, you’ll be left with a truly beautiful set of custom wooden loose parts!
All of your hard work will be rewarded though because I can truly say that I absolutely adore our set of custom wooden loose parts and we have found so many great ways to play with them! If you want to see how we use them in our daily life check out my Instagram!
I am going to compile a post about all the different ways you can use loose parts soon, but if you have any great ideas please share them with me down in the comments!
Other Posts you May Like

So pretty! I bought an unfinished set on etsy to try out but how many of each color did you end up with?
Awe Yay! So each shade has 6, but the color group has 18. So 6 light, 6 true or medium, and 6 dark in each color!
Gorgeous! Do you have a link for the raw wooden set that you purchased?
I don’t, it was on aliexpress so that listing is long gone, but search for wooden mandala pieces – there are listings on etsy now as well!
You’re set speaks to me! The best color combos I have seen May I ask, why do you want to redo your red?
Thank you so much! I want more pieces in deeper red tones. I have found too many pink tones and not enough red tones in our set right now.
hi- your post is confusing me just a bit. did you buy individual pieces from AliExpress & Etsy or a full unfinished set from AliExpress?
I bought a set of unfinished pieces off of AliExpress – my number of pieces is what is considered a half set. I ALSO purchased individual unique shapes off of Etsy. At the time that I purchased finding the mandala pieces on Etsy was near impossible. That is not the case any longer and you should be able to find everything you need on Etsy. Hope that helps
Can you share the exact colors for the coral, soft greens, and mauves for those of us not creative who prefer to copy.
I’m so sorry I painted them so long ago that I don’t recall the exact shades and I don’t have the bottles in my collection anymore!!!
OK Love this idea, but wondering if there’s a faster way to paint them. How many coats did you paint on the pieces? Would putting them in a ziplock with paint and shaking the bag work?
I think it would depend on how thick your paint is…but watered down a little I think it would work. Worth a try at least! Some of my pieces have a single coat. Other have multiple. It just kinda depends on the formula of the paint.