
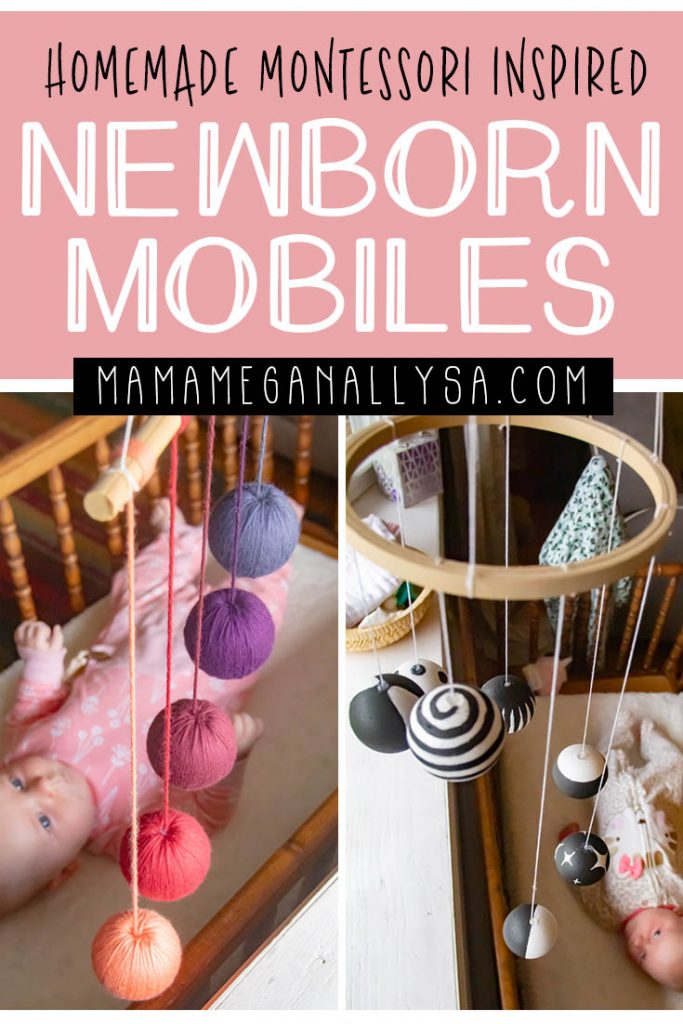
When it comes time for playtime with your newborn consider some DIY Montessori Inspired Mobiles! I have two simple variations on some traditional Montessori mobiles that you can make at home with a few simple supplies!
What Montessori Looks Life for our Home
For those of you who do not know Montessori is an educational theory that was developed by Maria Montessori where the key principles are Independence, Observation, Following the Child, Correcting the Child, Prepared Environment and Absorbent Mind. If you want to know more about it the Daily Montessori has a great breakdown of this!
Obviously, Bean is a bit young for some of the principles and we don’t follow strict Montessori by any means, but I take inspiration from the theory and make it work for us!

I do not pretend to be any kind of Montessori expert. I worked in a Montessori inspired daycare in college and really liked the focus on practical life and allowing the child to take the lead on what they want to learn about. I tried to implement some of the practices while I was a nanny, but that was mostly with toddlers and up. I never worked with the babies enough to really learn much from my days at the daycare.
When I had Bitty I was so overwhelmed with new motherhood and figuring out how to get his girl to sleep (the dreaded short naps were a big deal for her as a baby) that I didn’t really do much Montessori with her at all when she was a baby.
This time around I am a little more educated and a little less overwhelmed (though the short naps have returned…say it ain’t so!) I have been trying to involve a few more Montessori practices with Bean.
Montessori Inspired Mobiles Help your Baby’s Brain Develop, All While they Have Fun!
The first “toys” a baby plays with are not really toys, at least not in the traditional sense.
Obviously, babies can’t really use their hands so traditional play is out of their grasp (nudge nudge…HAHA see what I did there?!) Babies first play with their eyes!
Montessori inspired Mobiles are great for your baby’s first playtimes because they help to develop concentration and depth perception among lots of other things! Not to mention that mobiles naturally catch their attention and keep them entertained.
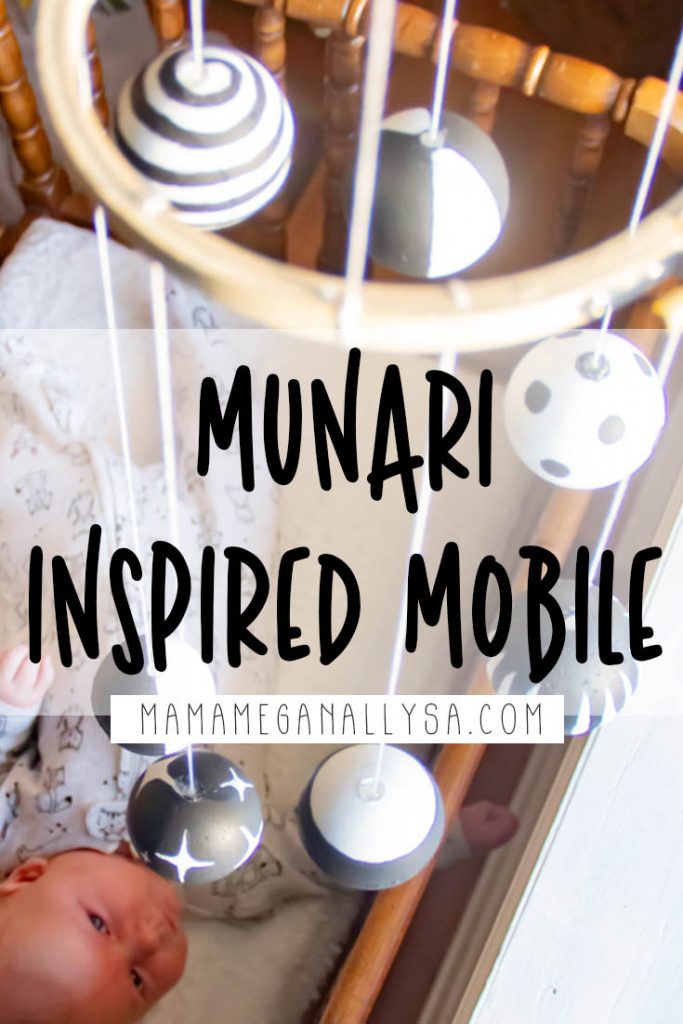
There are four Montessori mobiles designed for newborns and I chose to DIY two of them.
The Munari Mobile and the Gobbi Mobile
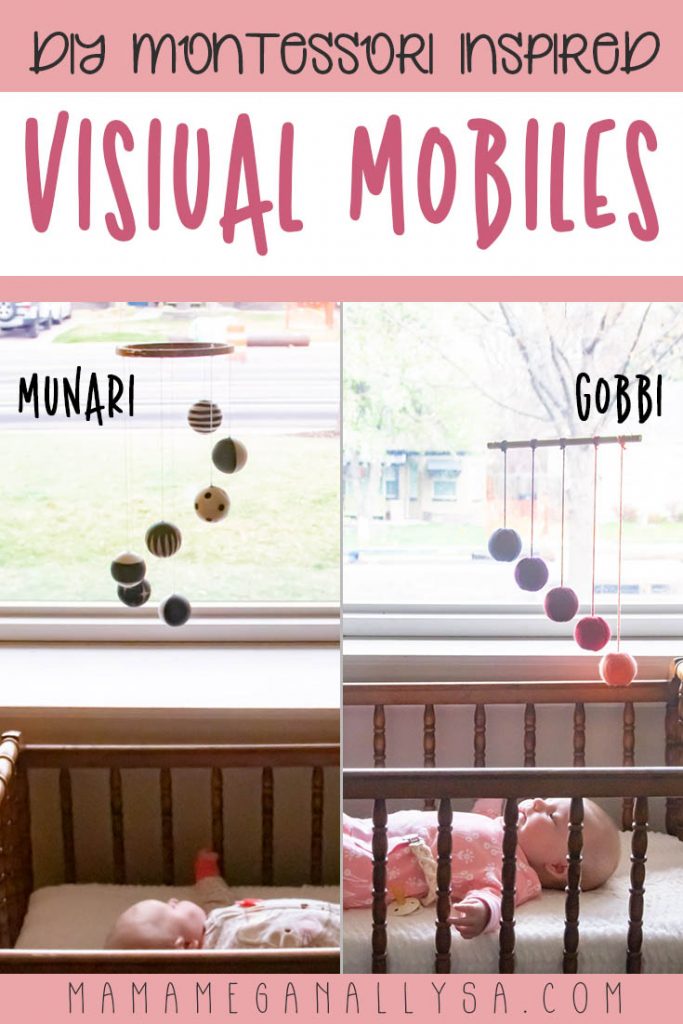
What is the Munari Mobile?
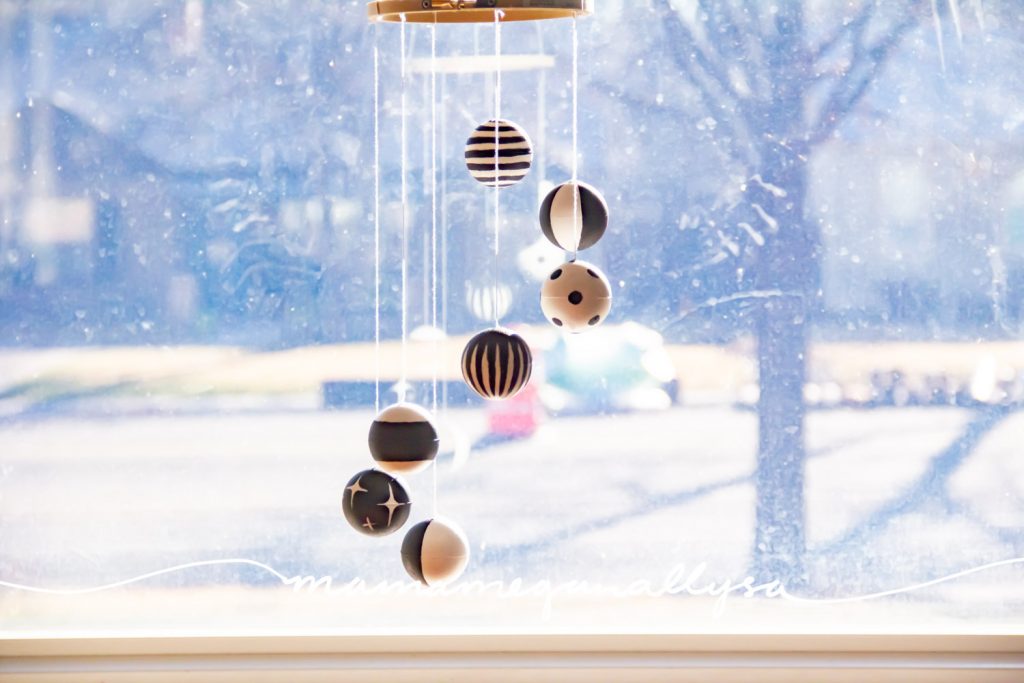
The Munari is a high contrast black and white mobile. You can introduce this mobile right away and honestly miss Bean still really likes this one at nearly 4 months.

The traditional Munari looks very different than my interpretation. I took my inspiration from The Kavanaugh Report. I really like the simplicity and more modern look that her design has, and it still covers the basic concept of the high contrast and varying depths.
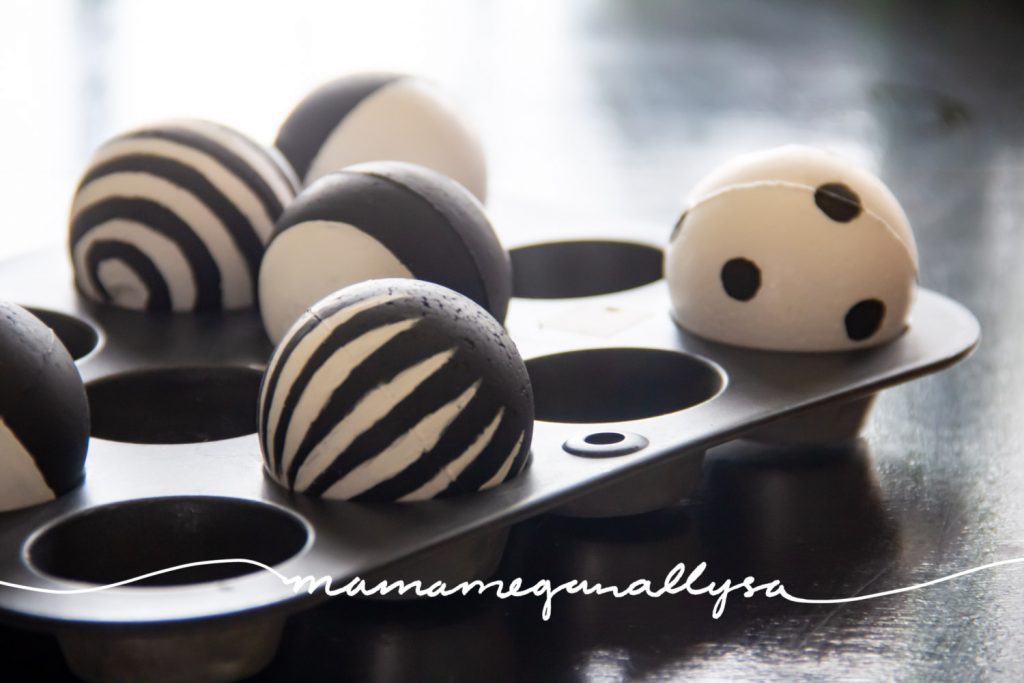
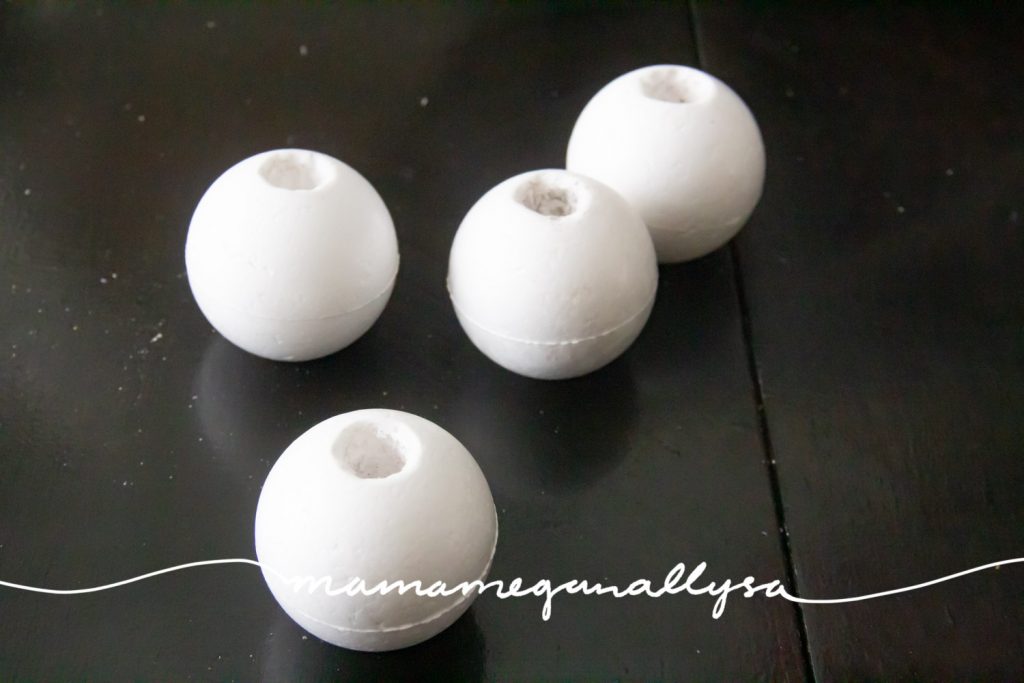
This was super simple to make. All you need is some string, some Styrofoam balls, black and white paint, and a ring of some kind to hang the balls from. I used an embroidery hoop.

Getting started with your DIY Munari Inspired Mobile
First and foremost, paint your balls. This was both the most fun part and the most frustrating part for me because well it must be perfect. If your more open to rustic lines, then this should be super easy for you!
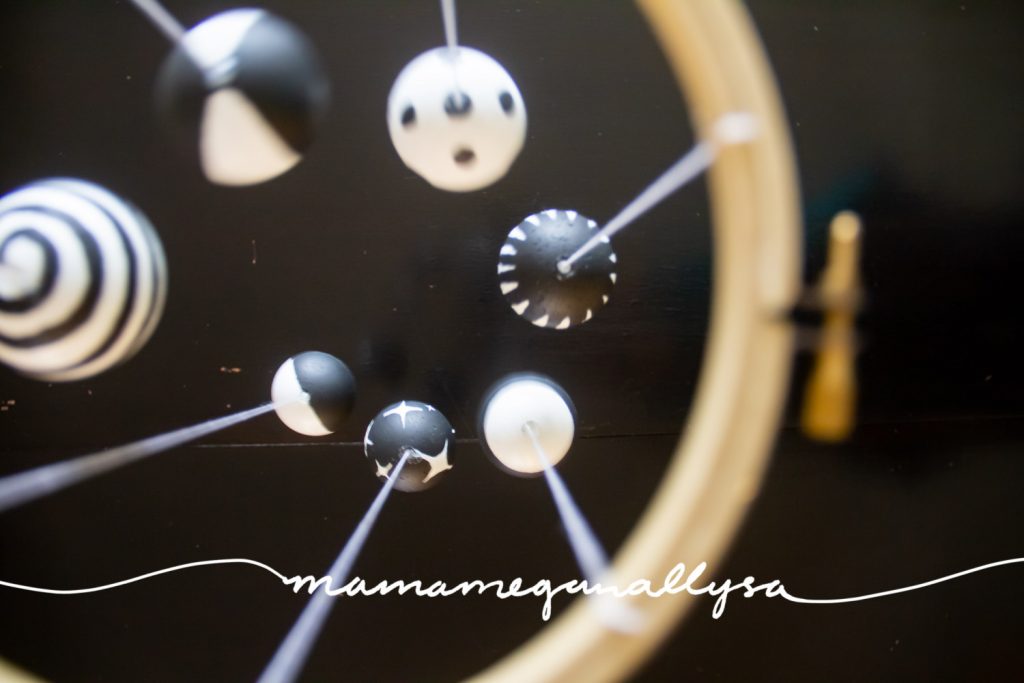
I painted a variety of high contrast black and white patterns on my Styrofoam balls and one thing to keep in mind, while YOU will be seeing the mobile from the side and top your babe will likely spend most of their time looking at it from the bottom so make sure that the bottom of the balls has a variety of patterns to look at.
Its All About the Visuals
I tried to have a nice mix of more solid simple patterns and more detailed complex patterns. I also made a point to have some of the balls favor black more than white so that there was a nice mix.
You can have as many or as few balls as you like I ended up with 7 This was the number that I felt looked the best based on the ring that I had. If your ring is smaller or larger or your balls are larger you will want to just have a look and adjust!
Time to assemble your Montessori Inspired Munari Mobile
After the balls are dry its time to attach the string. The Styrofoam balls that I purchased had a small whole in the top of the ball. This was the perfect spot to attach the string. I fed the string into the hole and then added a good dab of hot glue.
I kept all the strings long at this time so that I could rearrange them as I wanted on the hoop. Again I wanted to make sure that the variety of patterns was evenly mixed.
Once I was happy with an arrangement I started with the ball that was closes to the ring and tied it off on the hoop. From there each string gets a little longer and if your are like me your OCD will demand that the balls descend evenly around the ring. Just me? Well I got out the ruler and made sure that each string was equally longer each time. In the end is it perfect No. Is it close? I think so and I am happy with it.
Now add some strings to hang it with and tada! You have a DIY Munari Montessori inspired mobile.
Get Ready for Some Awesome Playtime with your Newborn
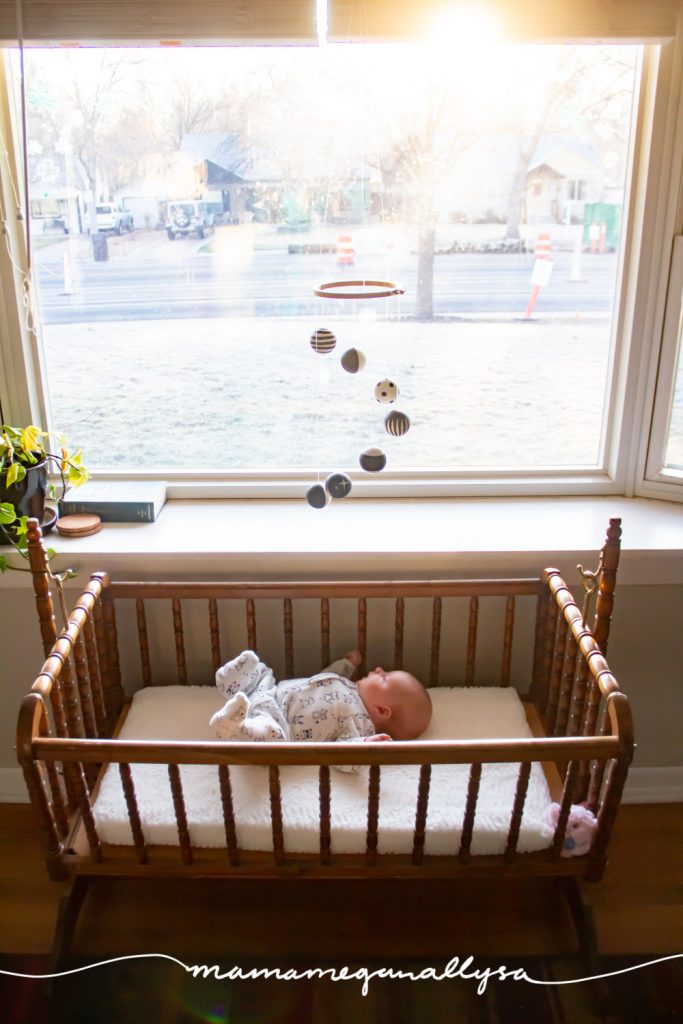
Ideally you are going to want to hang this just out of reach of your babe, this way it is close enough that their little newborn eyes can actually focus on it. You’ll want the lowest ball just a few inches above your newborn.
The varying height of the balls will help your newborn work on their depth perception and the high contrast patterns are easy for them to concentrate on!

A Munari Montessori Inspired Mobile is an Fun and Easy DIY

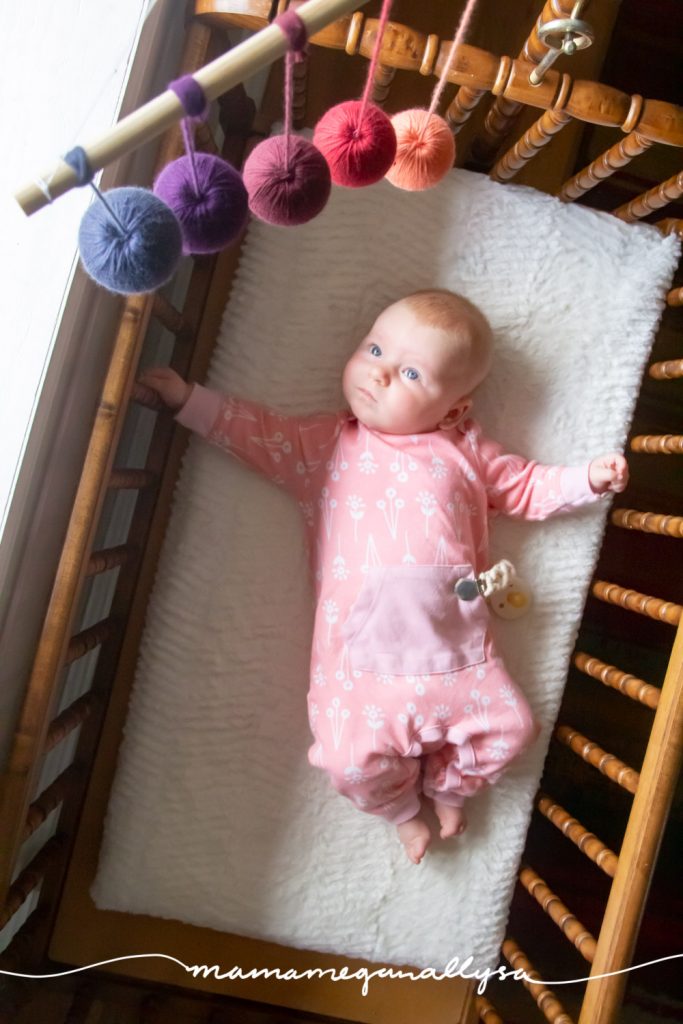
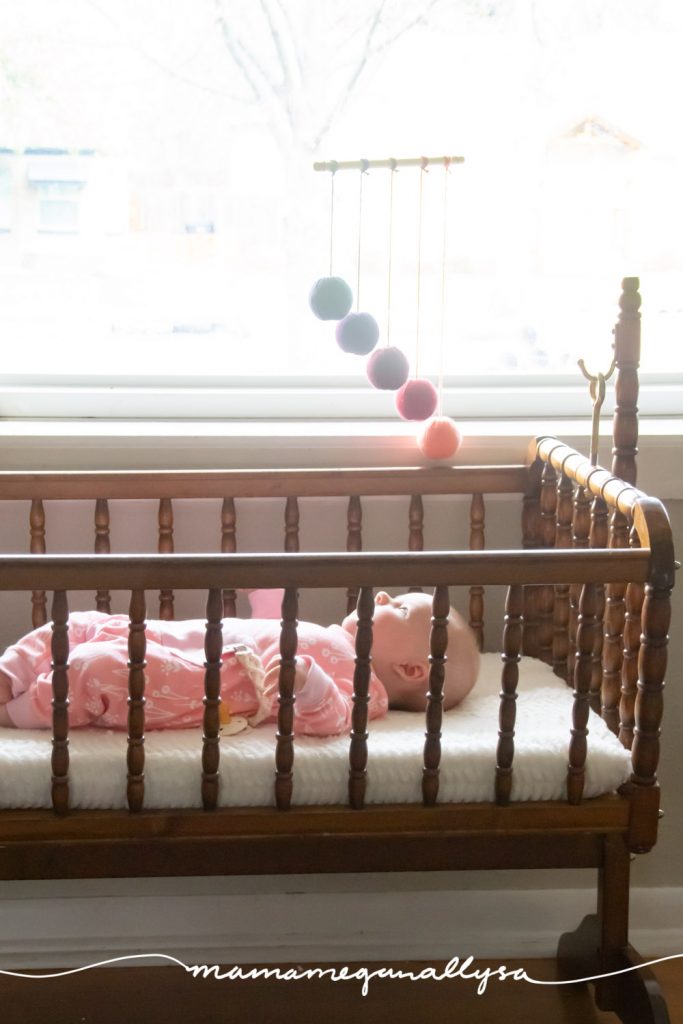
What is the Gobbi Mobile?
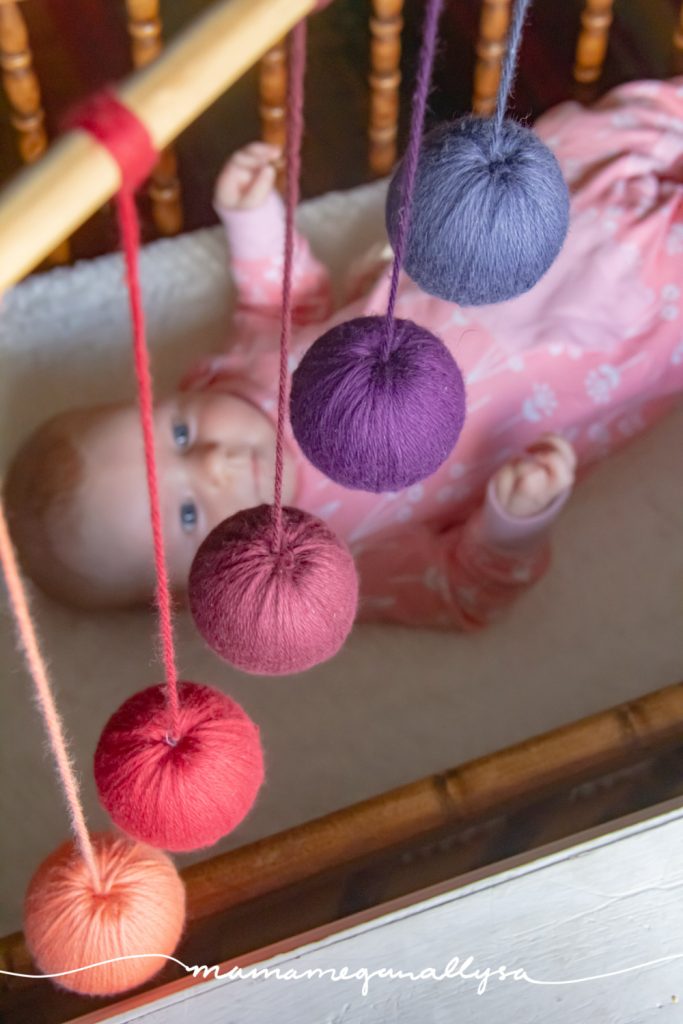
The Gobbi Mobile is a color gradient mobile designed to help with visual discrimination skills. You usually introduce this around 8 weeks give or take.

I chose to break from a traditional Montessori Gobbi Mobile and have a gradient of colors vs a gradient of light to dark. I did this for a couple of reasons.
- I wanted to make it with supplies that I already had on hand
- I like the colors and with this hanging in the living room I spend just as much time looking at it if not more than Bean.
Again if you want to know more about Montessori Mobiles the Kavanaugh report does a great job of breaking them down!
Getting started with your DIY Gobbi Inspired Mobile
To make this Montessori Inspired Mobile you will need some foam balls – mine are 2 inch balls, a dowel, string such as embroidery floss or yarn in a gradient of 5 colors and some string to hang it with.

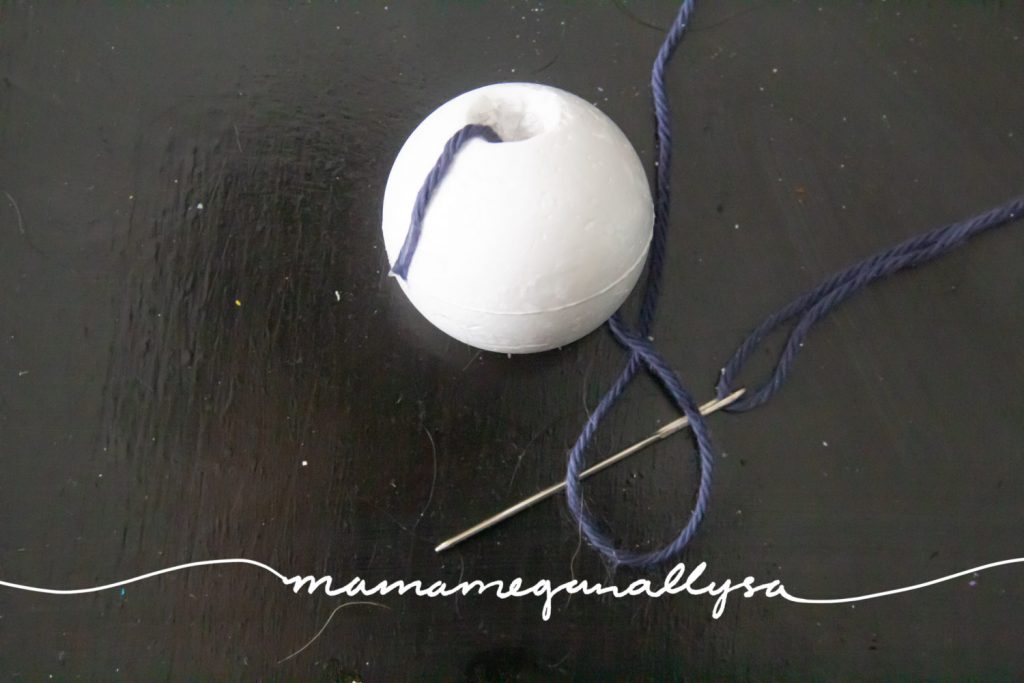
Your first step is to drill out the center of your ball and trust me your going to want a bigger hole than you think. Especially if you choose yarn. We did this using a drill bit and a drill press. Do you need to do it this way? NO was this the easiest method for us? Yes.
The foam balls I purchased were the smoother denser foam so hand carving the holes was not working. You could have done it this a hand drill for sure but that was a little trickier to control. We had the drill press available to us, so we went with it.
Once you’ve drilled out about a half inch hole you are ready to get started (a little less if your using embroidery floss)
Get Comfortable You are Going to be Here for a While
Your balls are ready but what about your string?
I originally wanted to use embroidery floss as this is the traditional material used in the Gobbi Mobile, but I quickly realized that no mater how I wrapped the string I did not have enough on hand and I really didn’t want to have to order any. As a semi-knitter I always have a collection of yarn on hand, so I dug through my stash and selected a similar pallet to what I was originally planning and started again.
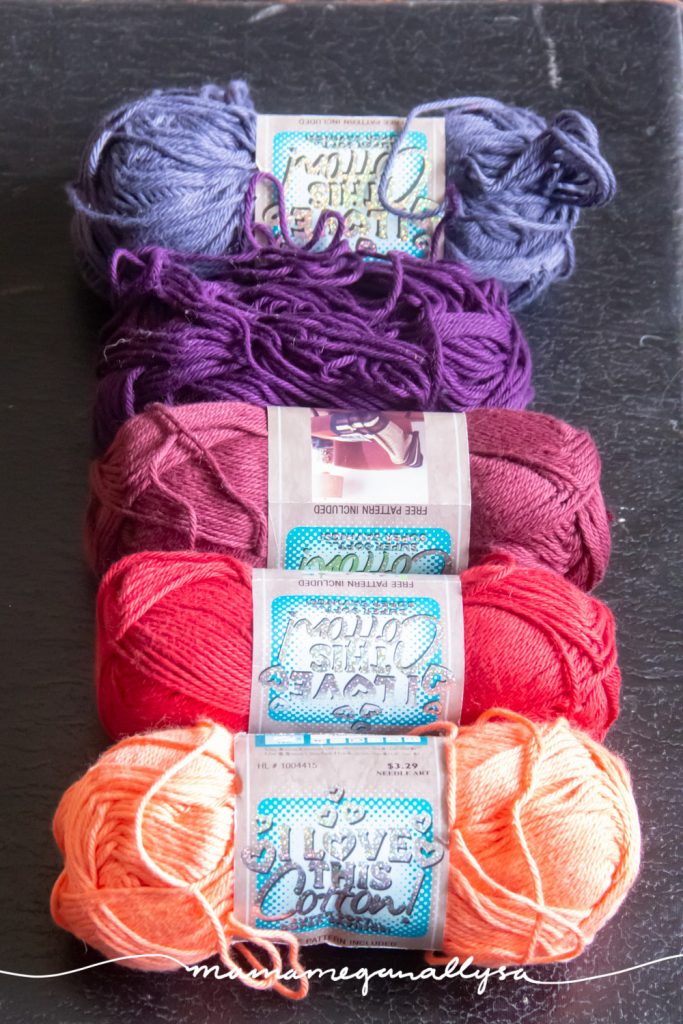
If you are going to do floss, you’ll need 3 of each of your colors. If yarn is more your speed a single skein of each color will be more than enough.
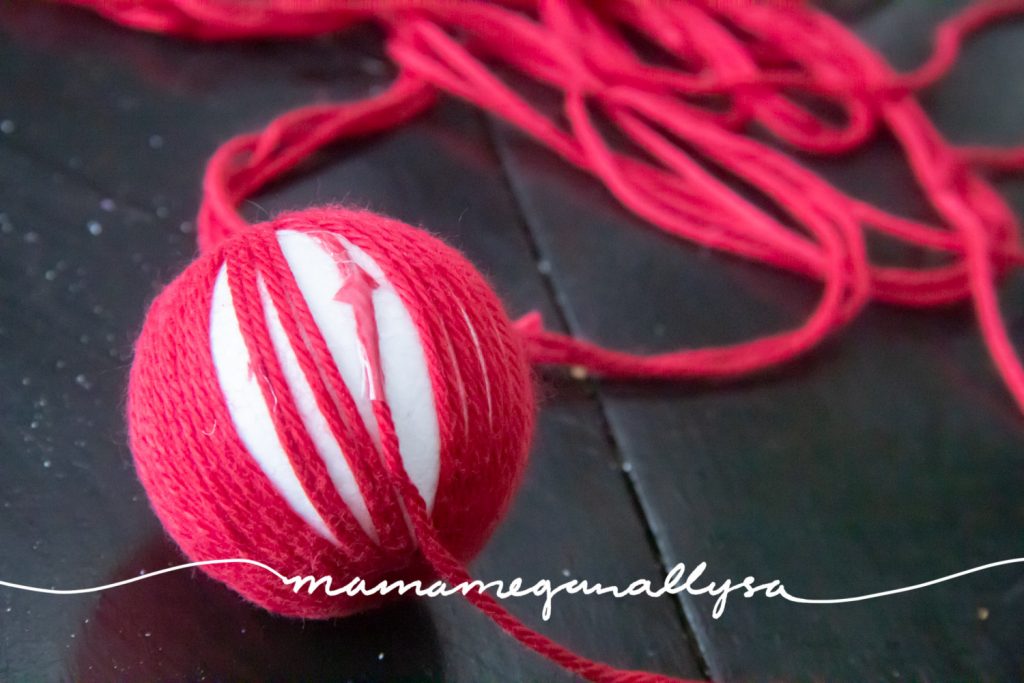
Thread your string on to a tapestry needle and tape the end of the string to the ball. Push the needle through the hole you created and wrap the sting around the outside and back down the hole. Repeat this over and over and over and over again.
I found that working my way around the ball in 3 or 4 passes worked better than slowly creeping around. It allowed for a more even coverage and kept the center from getting too congested.
So, as you wrap leave a little space between the strings and keep going you will circle back to fill that gap you left. Make sense?
Also, as you wrap, the center is going to get tighter and tighter and will eventually fill in completely. A thimble may help you push your needle through if your center gets too tight.
When you reach the end of a string tape it down the same way you taped down the beginning. I liked to start a new string right after the end of the other string. This way you only have tape in a couple places.
Repeat this process and you will have five balls completely wrapped in string with the tail of the string leaving he ball from the center. I left a nice long tail to allow me room to work when I was tying it on to the dowel.
Assembling your Gobbi Inspired Montessori Mobile
Congratulations you finished the most tie consuming part of the process. Next comes the more finicky part. Getting your angle right.
Lay out you balls with the center strings all leading up and start to rough in how close together and how long you want your center strings to be.

If I could do it all over again I would make this with a longer dowel so that I could have spaced the balls out more so that my angle would not have to be so steep.
Once you feel like you are where you want to be simply tie your center string to the dowel and tada you are done! Simple as that. I opted to wrap the sting around the dowel a few times just for aesthetic reasons you could totally just tie it off once if you prefer.
Now if you are being OCD like me, getting that angle right might take you a couple tries so go slow and make temporary knots until you’re sure you’ve got the balls right where you want them.
Presenting the Gobbi Inspired Mobile to your Newborn
Tie a string to each end of the dowel to create the hanging string and then I added a string from there so that I could add some length and be able to adjust the balance of the mobile easily.
Hang the your Montessori inspired mobile so that the lowest ball is just out of reach of your baby while they lay under it. Ideally you’ll want this space to be somewhere for playtime and not above where they sleep, as you are presenting this for playtime not bedtime. But lets be real newborns sleep everywhere…lol
Create a Beautiful Montessori Inspired Mobile for your Baby Play Space

Have you made any Montessori Inspired Mobiles for your baby? What one do you like the best?
I’m such a sucker for DIY and these were honestly super simple to make and I REALLY love the way they look and Bean seems to really enjoy them! That’s a win-win in my books!

Check out my Instagram for behind the scenes and sneak peeks of more DIY projects before they show up here!
Other Posts you may like


Hi ,beautiful and so simple ,can you tell me what length of yarn and what length of skeins would be required to cover a 2 in ball
Sorry, I did not keep track of yardage, and depending on the weight of the yarn you would need different amounts. I know that I did not use up an entire skein of any of my colors to wrap my balls and there are somewhere in the 2 in range…sorry I know that’s not super helpful! haha